Showing posts with label twitter. Show all posts

29 November 2010

Working with the 90 Character Limit of Twitter

What?  Twitter has a 90 character limit?  No, it's 140.  Everyone knows that.

Mr Wikipedia says this about SMS length: 

"... resources in the system could be used to transport messages at minimal cost. However, it was necessary to limit the length of the messages to 128 bytes (later improved to 140 bytes, or 160 seven-bit characters) so that the messages could fit into the existing signaling formats."

Using the Groovy code that I did the other day to send a text message via a twitter Direct Message, if the message length is greater than 140 characters, twitter complains with this error:

403:The request is understood, but it has been refused.  An accompanying error message will explain why.
{"request":"\/1\/direct_messages\/new.json","error":"The text of your direct message is over 140 characters."}
TwitterException{exceptionCode=[6bcd7469-01bff100], statusCode=403, retryAfter=0, rateLimitStatus=null, version=2.1.7}


That kinda says that I can send 140 characters, so what's this nonsense about a 90 character limit?

Well, true, you can send 140 characters but if you're hacking the system for the purposes of having Twitter forward your message as a text message to a phone then different rules apply.

Take a look at what happens when you send a Direct Message of 140 characters to an account that is set up to send a txt:
String message = "12345678911234567892123456789312345678941234567895" +
                 "12345678961234567897123456789812345678991234567891" +
                 "1234567891123456789212345678931234567894"

DirectMessage directMessage = twitter.sendDirectMessage(screenName, message)
Twitter breaks the message into 2 separate texts (and my phone occasionally gets the 2nd text first).

For the app that I'm working on, I need my data in a single text message, I don't want the mess of re-assembling.

I think the message split is because a header of:

"Direct from" screen name:

and a footer of

"Reply with 'd" screen name "hi.'"

is added to each message.

I've found that the amount of data that you can actually send depends on the screen name.  Since screen names can be up to 15 chars, you lose:

Header:
Direct from screenname:
= up to 28 characters (12 + screen name)

Footer:
Reply with 'd screenname hi.'
= up to 34 characters (19 + screen name)

140 - 28 - 34 = 78

Uh, 78 is not 90.  What the heck? I guess my math has errors.

But check this out.  By adjusting my direct message, I find that a 90 character message is the sweet spot for a 15 character screen name and the message is sent as a single text.  91 characters will cause the message to be split over 2 texts.

Maybe that header and footer isn't as big as I think it is.

140 - 90 = 50 characters for header/footer?

If a screen name is used twice (2 * 15 = 30), then maybe the bloat is only 20 characters?


What happens if I send messages to a different screen name, one that is smaller than 15 characters?

What is I use a screen name of 8 characters?  Should I be able to send a message of

140 - 20 (bloat) - (2 * 8) = 104 characters?

After a quick reassignment of my phone to a different twitter account, I tried a test with a screen name that is 8 characters.  Could I send 104?  Durn right I could!  And I could also send 109.  But 110 would cause a message split.  So I have an extra 5 characters unaccounted  for.

What happens if I send to a ...  No, this is going on too long. 

The max screen name is 15 characters and that limits the max amount of data that can be sent in one message to 90 characters.

If the screen name is less than 15 characters, then you get 90 plus some extra.  YMMV


What do you think? Leave a comment.

27 November 2010

Send SMS Text Message from Java/Groovy - via Twitter

Writing code to send an SMS text message is fairly easy on a smart phone like an Android.  But from a desktop, sending texts is still a mess, not always free, and/or requires a phone connected to your server.

I simply want to send a message to my phone when my app receives some data.  I don't need a complex library with lots of setup nor do I want to sign up for a pay service.

Now this isn't the cleanest solution to text from an app but Twitter can send messages to your phone when people you follow update their status, when someone mentions or replies to you, or when you get a direct message.

My last two write-ups, "Send a Simple Tweet with OAuth and Groovy" and "Send a Direct Message Tweet with Groovy" showed how easy it is to use Java/Groovy and the Twitter4J library to send messages to your own Twitter account or a message to anyone else.

By sending a tweet to an account that you follow or a Direct Message to your own account, Twitter can be setup to forward that message to a phone that you associate with your account.

Simply go to your Twitter account, Settings, Mobile and follow the easy instruction. Then use one of the sample apps from my previous posts and tweet-text away!

Note:
  • This only allows you to tweet-text to phones that have been setup to follow accounts. 
  • This does not allow you to send a text to a cell phone not registered with Twitter.
  • This works for what I need.
  • Do you know a better/easier, free method?  Write a comment!


What do you think? Leave a comment.

Send a Direct Message Tweet with Groovy

Alright.  Using the Twitter4J library and Groovy, I've beaten down the OAuth beast and have a simple example app to send a "update status" tweet.

Now instead of sending a message to my own account, let's do a real easy mod to send a Direct Message to a specific user   Using the same app as before, the only changes needed are:

  • import DirectMessage
  • change from twitter.updateStatus(message) to twitter.sendDirectMessage(screenName, message)
import twitter4j.DirectMessage;
import twitter4j.Twitter
import twitter4j.TwitterFactory
import twitter4j.Status
import twitter4j.http.AccessToken
import twitter4j.http.RequestToken
import java.io.BufferedReader
import com.thoughtworks.xstream.XStream

try{

   Twitter twitter = new TwitterFactory().getInstance();

   // set key and secret that you get from Twitter app registeration at:
   //     http://dev.twitter.com/pages/auth#register
   twitter.setOAuthConsumer("Your Consumer key", "Your Consumer secret");

   // load access token if it exists
   AccessToken accessToken = null
   def tokenFile = new File("accessToken.xml")

   if (tokenFile.exists()) {
      def xstream = new XStream()
      tokenFile.withInputStream { ins -> accessToken = xstream.fromXML(ins) }
      twitter.setOAuthAccessToken(accessToken)
   } 

   else {

     // get the URL to request access to Twitter acct
     RequestToken requestToken = twitter.getOAuthRequestToken();
     String authUrl = requestToken.getAuthorizationURL()
     System.out.println("Open the following URL and grant access to your account:");
     System.out.println(authUrl);

     // take the PIN and get access token
     System.out.print("Enter the PIN:");
     BufferedReader br = new BufferedReader(new InputStreamReader(System.in));
     String pin = ""
     pin = br.readLine();
     accessToken = twitter.getOAuthAccessToken(requestToken, pin);

     // persist token
     def xstream = new XStream()
     xstream.classLoader = getClass().classLoader
     new File("accessToken.xml").withOutputStream { out -> xstream.toXML(accessToken, out) }
   }

   String message = "from Groovy w/ token" + accessToken.getToken()
   String screenName ="ScreenNameToSendTo"

   DirectMessage directMessage = twitter.sendDirectMessage(screenName, message)
   System.out.println("Direct message sent to " + directMessage.getRecipientScreenName());

} catch (Exception e) {
   e.printStackTrace();
}

What do you think? Leave a comment.

Sending a Simple Tweet with OAuth and Java/Groovy

Come on, man!  What used to a be a simple task to send a tweet is now a OAuth nightmare.

A year or so ago, I built that tweet-a-w/e thing that sniffed XBee chirps and sent them to a twitter account that kindly routed them to my cell phone.

I have a need now to receive an XML stream, parse out a few tidbits and then send the results out as a SMS text message.  Remembering that tweet-a-w/e app, I thought that I would again leverage Twitter to send the text message.  All I need to do is send a tweet via a Twitter API and have my account set up to send the content to a phone number.

This time my XML receiver is in Java/Groovy, so I grabbed the latest Twitter4J, glanced at the UpdateStatus example and tried a quick test with Groovy.
import twitter4j.Twitter  
import twitter4j.TwitterFactory  
import twitter4j.Status  
    
Twitter twitter = new TwitterFactory().getInstance("myAcct","myPassword");  
Status status = twitter.updateStatus("from Groovy");  
System.out.println("Successfully updated the status to [" + status.getText() + "].");  
Did that work?  Of course not.  Authentication FAIL.

Caught: 401:Authentication credentials were missing or incorrect.
{"errors":[{"code":53,"message":"Basic authentication is not supported"}]}
TwitterException{exceptionCode=[15bb6564-00e5bee0], statusCode=401, retryAfter=0, rateLimitStatus=null, version=2.1.7}

What the heck?  Basic Authentication is not supported?  Darn it, what is this stupid OAuth thing about?  Here's the Twitter page "Authenticating Requests with OAuth" that looks real interesting to read.  Arghhhhh.  I just want to send a flippin' tweet, I really don't have time to research this at Hueniverse.

After some more quick Googling, this isn't as bad as it first looks.It boils down to getting a key and secret pair.  The steps are:
  • Goto Twitter and register your app.
  • You'll get a consumer key and secret which are similar to the public and private keys used in protocols such as ssh. 
  • Use the key and secret to sign every request you make to the Twitter API
import twitter4j.Twitter  
import twitter4j.Twitter
import twitter4j.TwitterFactory
import twitter4j.Status
import twitter4j.http.AccessToken
import twitter4j.http.RequestToken
import java.io.BufferedReader

try{

   Twitter twitter = new TwitterFactory().getInstance();

   // set key and secret that you get from Twitter app registeration at:
   //     http://dev.twitter.com/pages/auth#register
   twitter.setOAuthConsumer("Your Consumer key", "Your Consumer secret");

   // get the URL to request access to Twitter acct
   RequestToken requestToken = twitter.getOAuthRequestToken();
   String authUrl = requestToken.getAuthorizationURL()
   System.out.println("Open the following URL and grant access to your account:");
   System.out.println(authUrl);

   // take the PIN and get access token
   System.out.print("Enter the PIN:");
   BufferedReader br = new BufferedReader(new InputStreamReader(System.in));
   String pin = ""
   pin = br.readLine();
   AccessToken accessToken = twitter.getOAuthAccessToken(requestToken, pin);

   String message = "from Groovy w/ pin" + pin
   Status status = twitter.updateStatus(message);
   System.out.println("Successfully sent " + message);

} catch (Exception e) {
   e.printStackTrace();
} 

Ok, so that works.  But every time you run the program, you need to go and fetch the darn token.  According to Twitter, the token doesn't expire, so let's persist the thing.

I like using XStream to serialize Java/Groovy objects to/from XML.  A quick update to the code above lets us save an XML file that we can reload as needed.
import twitter4j.Twitter
import twitter4j.TwitterFactory
import twitter4j.Status
import twitter4j.http.AccessToken
import twitter4j.http.RequestToken
import java.io.BufferedReader
import com.thoughtworks.xstream.XStream

try{

   Twitter twitter = new TwitterFactory().getInstance();

   // set key and secret that you get from Twitter app registeration at:
   //     http://dev.twitter.com/pages/auth#register
   twitter.setOAuthConsumer("Your Consumer key", "Your Consumer secret");

   // load access token if it exists
   AccessToken accessToken = null
   def tokenFile = new File("accessToken.xml")

   if (tokenFile.exists()) {
      def xstream = new XStream()
      tokenFile.withInputStream { ins -> accessToken = xstream.fromXML(ins) }
      twitter.setOAuthAccessToken(accessToken)
   } 

   else {

     // get the URL to request access to Twitter acct
     RequestToken requestToken = twitter.getOAuthRequestToken();
     String authUrl = requestToken.getAuthorizationURL()
     System.out.println("Open the following URL and grant access to your account:");
     System.out.println(authUrl);

     // take the PIN and get access token
     System.out.print("Enter the PIN:");
     BufferedReader br = new BufferedReader(new InputStreamReader(System.in));
     String pin = ""
     pin = br.readLine();
     accessToken = twitter.getOAuthAccessToken(requestToken, pin);

     // persist token
     def xstream = new XStream()
     xstream.classLoader = getClass().classLoader
     new File("accessToken.xml").withOutputStream { out -> xstream.toXML(accessToken, out) }
   }

   String message = "from Groovy w/ token" + accessToken.getToken()
   Status status = twitter.updateStatus(message);
   System.out.println("Successfully sent " + message);

} catch (Exception e) {
   e.printStackTrace();
}

The serialized Access Token looks like this:


  5555555-AbCdEF
  1oKiOlOlOlOl
  
    oauth_token=5555555-AbCdEF
    oauth_token_secret=1oKiOlOlOlOl
    user_id=007
    screen_name=bond

  
  bond
  007

Notes:

For the above examples, I used:
  • Groovy Version: 1.7.0 JVM: 1.6.0_22
  • Twitter4J 2.1.7  For this, I copied only the twitter4j-core-2.1.7.jar into the Groovy lib folder.  On Linux, this is /usr/share/Groovy/lib
  • XStream 1.3.1  For this, I copied the xstream-1.3.1.jar and xpp3_min-1.1.4c.jar into the Groovy lib
What do you think? Leave a comment.

28 March 2009

XBee Adapter Kit PDQ

Just got done building an XBee Adapter and tested it in 34 minutes. That's right, 2040 seconds. Or 0.566666667 hours. Either way, it's PDQ.

I'm a soldering novice. I've been burning my finger tips for some years now but in limited batches so I'm in no way claiming any skill. (Actually, I'm claiming a lack of skill) And I wasn't speeding, I was in no rush to build this thing.

I opened the mail and snapped that there picture over there. Plugged in my soldering iron and started to look through the adapter pieces as it warmed up.

I built one of these last year so I knew the routine. They're so dirt simple, I didn't even have to look over adafruit's instructions this time. I just glanced at my other adapter to see which resistor was which. Everything else is a no-brainer to fit onto the board.

I did a few things different this time though. Since I don't have a PCB vice, I'm stuck with having the board laying flat on my bench. So I soldered in the 74125 buffer first, the female header sockets next, all the other pieces, and the male header pins last. Your mileage may vary, it was just simpler for me in that order.

So if I already have one of these (and a XBee Shield and a XBee Explorer), what the heck am I doing building another?

Now that I have a workable tweet-a-w/e, I need more XBees "whatevers".

I'm planning to have temperature sensor to tweet swimming pool data. So I need another XBee and an XBee Adapter.

I'm planning to use Sparkfun's Nike+ receiver in a Serial Adapter connected to an Arduino and start tweeting stalker data. So I need another XBee and an XBee Adapter.

I'm planning to hook up various ADC things to an Xbee and start tweeting real data. So I need another XBee and an XBee Adapter.

Get the point? I need more XBees and XBee adapter kits. Unfortunately the boss doesn't understand, so I will need to get these one or two at a time.

I finished soldering, slapped in an XBee and ran a test script that tweeted a tid bit to twitter. I knew I was making good progress but only noticed how fast after I snapped a second picture, and saw the timestamp. 34 minutes. I can't even make minute rice in 34 minutes.

22 March 2009

tweet-a-whatever (tweet-a-w/e) foundation

My explanation of the tweet-a-w/e ran pretty long in my last post. I took an Asus wl-520gu wireless router, installed OpenWrt, Python, and an Xbee to build the foundation of a tweet-a-whatever (tweet-a-w/e). My 13 year-old texting obsessed daughter choose that name BTW. The last post ran so long that I cut it off after I talked about how to read the serial port with pySerial.

This time, I'll explain a simple Python app that receives a string from a Xbee, decodes its header and then tweets the payload to a twitter account. I'm a complete Python newb so if you have suggestions on a better implementation, I'm all ears.

Here's basically what I've done. Heavily borrowed from mightyOhm and ladyada, this project receives data from Xbees in "the field". Using a unique header, the client app determines the payload destination which can be a tweet or a web service.

Mr mightyOhm has written a great series on hacking the Asus wl-520gu wireless router to build an open source wireless streaming internet radio receiver. If you haven't read thru Jeff's work, stop right now and read it. Now.

Ladyada's award winning tweet-a-watt takes data from a kill-a-watt, sends it to Xbee embedded in a hacked wl-520gu and then tweets it for the world to see how green you are. I've copied the Xbee connection from her and the idea of using Python. She didn't post her Python source, so I've had to stumble thru this. I just read tonite, that the tweet-a-watt project will be a project in Make Magazine, volume 18. [update] ladyada did post her source, I just missed it. Check out her good stuff here.

My tweet-a-w/e's spin is that any data generating thing (a "whatever") can be hooked to an Xbee in the field. Either directly to the Xbee or via an Arduino. The Xbee transmits to a receiving Xbee that has been wired into the serial port of a hacked Asus wl-520gu. The Python app running on the router reads the data and based on a unique header code, the payload is either tweeted or sent to a web service.

So I ended last time by showing a small snippet of Python that read the incoming data and printed it. Now let's modify that snip so it reads the first few characters and makes a decision of what to do. This first revision is pretty hackish and we'll improve on it as "whatevers" are added in the field. My opinion is get it working, then optimize.

Last time we installed Python but I didn't tell about the python-twitter wrapper from DeWitt Clinton. Here's what I did:
  • Install simple JSON dependency
  • wget http://pypi.python.org/packages/source/s/simplejson/simplejson-2.0.9.tar.gz
  • gunzip simplejson-2.0.9.tar.gz
  • tar xvf simplejson-2.0.9.tar
  • python setup.py install
And crash. Some weird error about "No module named _md5". WTFO?

Mr Google has no clue about this error. Plenty of problems, but I couldn't find anything. I mucked with my LD_LIBRARY_PATH and considered rebuilding Python. Finally, I actually started looking at the source referenced in the trace. Here's what I found. Install OpenSSL and problems are solved. I wrote about my fun here.
# opkg update
# opkg install openssl-util
And finally install python-twitter:
  • wget http://python-twitter.googlecode.com/files/python-twitter-0.5.tar.gz
  • gunzip python-twitter-0.5.tar.gz
  • tar xvf python-twitter-0.5.tar
  • python setup.py install
Woo hoo. We're ready to tweet.

I'm currently planning 4 whatevers that will be talking to the router:
Each whatever will be uniquely ID'd so the incoming data can be routed to a twitter acount or any other web resource. Because my originality lacks, I started with "[0]" for the test Xbee on my laptop, "[1]" for the temperature sensor, "[2]" for the Nike+, and "ox7e" for the Xbee.

I created an array to hold the whatever name, the unique header, the action to perform, and username/password:
# tweet-a-w/e stuff array
#   "whatever", header string, action, user, password
#
WE_ARRAY = [
['WE_TEST', '[0]', _tweet_it, 'username', 'password'],
['WE_TEMPERATURE', '[1]', _web_it, 'username2', 'password'],
['WE_NIKEPLUS', '[2]', _stalk_it, 'username3', 'password'],
['WE_XBEE', '0x7e', _tweet_it, 'username4', 'password']
]
The action array elements are functions to perform the tweet or web action. Here's what I defined:
#
# define functions to do something with received data
#

# tweet data
#
def _tweet_it(data, twuser, twpass):
# login to twitter
print 'tweet w/' + twuser
api = twitter.Api(username=twuser, password=twpass)
api.PostUpdate(data)

# web service data
#
def _web_it(data, twuser, twpass):
# tbd
print 'wrote to web service w/' + twuser

# stalk the data
#
def _stalk_it(data, twuser, twpass):
# tbd
print 'watch it w/' + twuser
Ok, now let's read the data and determine what we got:
# open up the serial port on router
#
print 'opening serial port ' + SERIALPORT
ser = serial.Serial(SERIALPORT, BAUDRATE, timeout=TIMEOUT)
ser.open()

# read data
#
try:
print 'entering read loop'

# loop forever
while 1:

# read it from serial port
data = ser.read(NUMCHARS)
if len(data) > 0:
print 'Read: ' + data

# loop thru our whatever array and see if we recognize the header
for i in range(0, len(WE_ARRAY)-1):
if data.startswith(WE_ARRAY[i][1]):
print WE_ARRAY[i][0] + " action " + WE_ARRAY[i][2].__name__
WE_ARRAY[i][2](data, WE_ARRAY[i][3], WE_ARRAY[i][4])
break

finally:
print 'closing serial port'
ser.close
The only tricky thing in that code is the action call. Once we have a header match, the 2nd array element is one of the action functions that we defined. Simply call it and pass the data, username/password as arguments.

My Python client file is here.

Get your file on the router and start it:
root@OpenWrt:/opt/project# python XbeeReader.py
And send it something. For me, a quick test is to use another Xbee in the SparkFun Xbee Explorer. When I plug this in to my laptop, it shows up as /dev/ttyUSB0 so to write a quick string is as simple as:
d@hopper:~/projects/wl-520gu$ echo "[0] Testing " + `date` > /dev/ttyUSB0
And on the router telnet window, I see:
opening serial port /dev/tts/0
entering read loop
Read: [0] Testing + Thu Mar 26 23:30:47 EDT 2009
WE_TEST action _tweet_it
tweet w/skibicki
I'm using a test twitter account and viola, the string "[0] Testing" shows up like magic.

How are the Xbees configured? Real easy. I put ZNET 2.5 Router / End Device AT firmware version 1244 on both. I use Linux so using X-CTU was a little tricky until I figured out how to use it with Wine. I wrote about it here.

The Xbee in the router is named PINK. Last year, I built the NKC Xbee Shield Kit and goofed something up. When I installed the Xbee, it got really hot and the white Xbee label turned pink. It still works but is discolored. Here's the X-CTU file for PINK.

The Xbee connected to my laptop via the Xbee Explorer is named WHITE. Because it's not discolored. The config is EXACTLY same as PINK except for the name and destination. After loading the ZNET 2.5 Router / End Device AT firmware, I went to the X-CTU Terminal tab and typed:
+++
ATNI WHITE
ATDN PINK
ATWR
Here's the X-CTU file for WHITE.

Plans for next time. Clean up the client so only the data is written to twitter and not the unique header. Then hook up the DS18B20 temperature sensor and start tweeting real data.

What do you think? Leave a comment.

21 March 2009

tweet-a-w/e using Asus wl-520gu and Xbee

Update: Newegg no longer stocks the Asus WL-520GU router but this is still a cool project. You can find these routers for $10-20 (or more) on eBay. Also someone sent me a comment that the Linksys WRT54G routers have serial ports that could be used in a similar manner. I haven't tried this yet but if a cheap Linksys router comes my way, I'll try and attempt to blog about it.
---------------------------------------------------------------------------------------------
A few of the geeks that I stalk follow on twitter have done some interesting things with the Asus wl-520gu wireless router. Jeff Keyzer of mightyOhm has a real nice series on using the router where he builds an open source wireless streaming internet radio receiver. He walks you step-by-step on why he chose the wl-520gu, how to load OpenWrt, adding a serial port header, and even interfacing it to an Atmel ATmega168 AVR microcontroller to drive an LCD. Very nice, thanks Jeff.

Mr mightyOhm is also the admin of the Asus Wireless Router Hacks Flickr Pool. Check out a few of the cool things he and others have done with the wl-520gu.

Not to be out done, LadyAda hacked her 520gu and ported her tweet-a-watt xBee code in a 5 hour hack fest. That's her router picture over on the right. Click it and see a brief description of her efforts. She mentions this project on twitter and on flicker but I haven't seen it on her blog. I've been messing with Xbees lately and ladyada's hack is just what i need.

I've been thinking about a tweet-a-temperature project that would monitor my pool temperature and tweet it every so often during the summer months. While I'm toiling away in the office, I could get SMS spam telling how great life is outside work.

Or maybe a tweet-a-lert that let's me know when my super-sekret door has been opened. Or a tweet-a-stalk when a victim with Nike+ shoes runs by a sensor.

Let's lay down the foundation for a tweet-a-whatever (tweet-a-w/e) project by hooking an Xbee to the router and installing a Python client that tweets whatever is received.

Yes, this seems to be very similar to ladyada's tweet-a-watt port. I'm shamelessly copying the hard work of mightyOhm and adafruit to set this up. What's my value-add? I'll ramble a lot and tell you about all my dead-ends.


We'll take a wl-520gu router, install openWrt firmware and configure it as a wireless client to my existing house wireless network. Using the 520gu's serial port, I'll hook up an Xbee in an Adafruit adapter. Next, install Python on an automount USB drive and write a client that reads incoming Xbee data and does the tweet.

So I ordered a wl-520gu from newegg and eventually pretty much followed mightyOhm's instruction for installing header pins on the serial port and installing OpenWrt.

If you've read any of my other ramblings on this blog, you know already that I'm not very original and sometimes not very smart. But I'm decent at stealing reusing other people's work and twisting it to fit my needs.

Let's first talk about the stupid things I did so you can avoid the mistakes in life that I have made.
  • Both mightyOhm and ladyada used OpenWrt by first flashing dd-wrt and then OpenWrt. Me? I choose to use tomato firmware instead because I wanted built-in USB support and the description of its feature sounded great. And because I wanted to waste 3 nights trying to configure it in wireless client mode. I'm not saying tomato is bad, I'm just saying that I struggled big time and I couldn't find many online tips. I finally said "uncle" and followed the mightyOhm's way and installed openWrt. And had it working in under a half-hour.
  • Installing a four-pin header isn't a hard thing. All I had to do was remove 4 blobs of solder and then solder in a header. So ... Why did I somehow brick my router? I was super duper careful removing the blobs (without a de-solder-er iron or a bulb) and then was careful soldering in the pins. I only applied heat for a max of 5 seconds and let it cool for about 5-10 seconds before re-attempting. Yet I did it. After I finished the header, the darn thing wouldn't boot. Nothing, dead to the world. No reset, no LED action, nada. I cussed for a day or two and then ordered a new one from newegg. Before I de-blobbed the new one, I ran down to Rat Shack and bought a desoldering bulb. 20 minutes later, I had a working router - with header pins. Lesson? If at first you don't succeed, spend more money.
  • With the default Asus firmware still installed, I found that logging in via telnet, the user/password was root/admin. Via the browser at 192.168.1.1:80, the user/password was admin/admin. Kinda odd, but maybe this tip will save you some hair.
Okay, so where are we in this story? Oh yeah, the start. Buy a wl-520gu router and boot it up fresh from the box. Don't muck with anything yet. Confirm that it starts and you can log in via a wired ethernet cable on a LAN port. The default address, username, password are on the bottom of the router (192.168.1.1, admin, admin).

On the 1st router that I bricked, I installed new firmware first, then tried to install the headers. On my working router, I did headers first, then firmware. I don't think it really matters what order you do this. But I ruined a $59 router, so you trusting me?

So do your own thing and follow mightyOhm's excellent instructions. Get headers on the serial port, install openWrt, and meet me back here in a few.

Back already? Good, you should have a router with OpenWrt that acts like a wireless client on your network. You should be able to wirelessly connect via telnet as well as via the serial port.

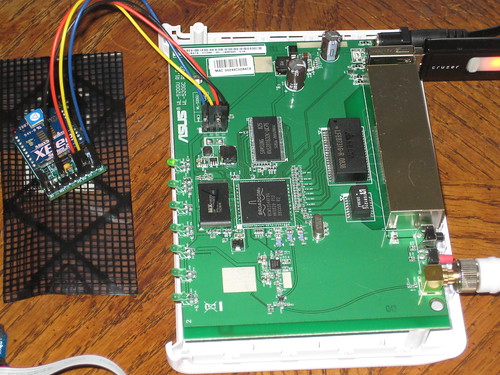
Yeah, I know the picture over there is kinda blurry but it's the best camera I have (donations accepted). If the picture was clear, you would see that I'm using a USB TTL-232 cable to talk to the router from a USB port to the router's shiny new headers. mightyOhm's picture on this page was very helpful for the pin-outs.

As is, the OpenWrt's filesystem is pretty cramped. There's not much space available to install extras such as Python. I had an extra Sandisk Cruzer laying around so I setup the router to automount the USB stick on /opt.

From either the serial line or a wireless telnet (my preference),
Then using hints from the openWrt wiki, I executed these commands:
  • # opkg update
  • # opkg install kmod-usb-core
  • # opkg install kmod-usb-ohci
  • # opkg install kmod-usb-storage
  • # opkg install kmod-fs-vfat
  • # opkg install kmod-fs-ext3
I installed both vfat and ext3 because my USB stick was currently fat but I wanted to reformat it to ext3. That should be pretty simple to do but as with most things, it was a hassle. I finally found how to do it and did this (click the link).

I want to install Python libraries and other extras on the USB drive so we'll need this auto-mounted at boot time. I couldn't locate clear instructions on this but here's what worked for me. Using tips from this place, I did:
  • Create a mount point
  • # mkdir /opt
  • Create an /etc/rc.d/S11mount file with macsat.com contents from this page.
  • NOTE: macsat's page references this as /etc/init.d/S11mount. For my version to work, I did not put it in init.d but instead put it in rc.d
  • # vi /etc/rc.d/S11mount
  • Paste in macsat's example S11mount content. My file version can be found here.
  • change the MOUNT_DEVICE0 statement to match your device. My USB stick was exactly the same as his example.
We're really making progress now. Next, we want to setup opkg so we can install large packages such as Python to the USB. Again, I'm using tidbit's from macsat.com excellent pages. Here's the good stuff.
  • Edit opkg config file to create an alternative destination for packages
  • # vi /etc/opkg.conf
  • Add this line:
  • dest opt /opt
  • My copy of the opkg.conf file is here.
Now some housekeeping. Since we want to install libraries and stuff on the USB stick, we'll need to continue following macsat's advice and update PATH and LD_LIBRARY_PATH in your /etc/profile. I set mine to:
  • export PATH=/bin:/sbin:/usr/bin:/usr/sbin:/opt/bin:/opt/sbin:/opt/usr/bin:/opt/usr/sbin
  • export LD_LIBRARY_PATH=/lib:/usr/lib:/opt/usr/lib:/opt/lib
If you'll be installing services on /opt that you want to start at system boot time, be sure to check out macsat's script here. I'll be using this after I complete the client app. For now, I'm just manually starting.

At this point, we have a flashed wl-520gu router with OpenWrt, headers soldered to serial port, and configured to mount a USB stick to opt at bootup. Let's keep mushing on.

The line that we added to the top of our opkg.conf file
sets us up to install from the kamikaze 8.09 packages which contain the Python 2.5 that I seek. Do this to install Python on the opt mount:
  • # opkg update
  • # opkg -d opt install python
Assuming that you haven't fallen asleep and you've setup your route similar to mine, after a few minutes, Python and all dependencies will be safely setup on /opt. Give it a try:
  • # python -V
And you should see the proof:
Python 2.5.4
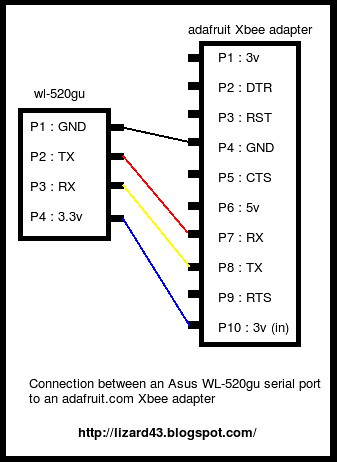
Using the AdaFruit Xbee Adapter that I blogged about last year, the next step is to simply hook it up to the 4-pin serial headers. This is the easiest step of all. 4 wires, hook 'em up.
  • wl-520gu GND -> Xbee GND
  • wl-520gu 3V -> Xbee 3V
  • wl-520gu TX -> Xbee RX
  • wl-520gu RX -> Xbee TX
Since OpenWrt uses the serial port /dev/tts for console login, we need to modify the /etc/inittab file. All this takes is to comment out the tts line:

#tts/0::askfirst:/bin/ash --login

I'm using Python for the client app, so we need to install the pySerial module from SourceForge. Create a temp folder on /opt, CD to it, download pySerial, unzip, untar, and install
All we need now is a app that reads the serial port and tweets. This blog getting pretty long so I'll just explain the serial port read and talk about the tweet part next time.

reader.py

#!/usr/bin/env python
import serial, time

SERIALPORT = "/dev/tts/0"     # the com/serial port the XBee is connected to
BAUDRATE = 9600               # the baud rate we talk to the xbee
TIMEOUT = 0.5                 # the timeout to wait for buffer fill
NUMCHARS = 140                # the number of characters to attempt to read at once

# open up the FTDI serial port to get data transmitted to xbee
print 'opening serial port ' + SERIALPORT
ser = serial.Serial(SERIALPORT, BAUDRATE, timeout=TIMEOUT)
ser.open()

try:
print 'entering read loop'
while 1 > 0:
data = ser.read(NUMCHARS)
if len(data) > 0:
print "Read " + data
finally:
print 'closing serial port'
ser.close
I've modified the reader.py quite a bit so that it tweets the received data, but the version above simply echoes the data to the terminal.

Run it like this:
# python reader.py
Send the Xbee data from another Xbee and watch it print.

Alright, I'm stopping and will pick up the story in my next entry. Look at this picture to see where we're going.


What do you think? Leave a comment.

03 January 2009

GPS and Twitter

Early last year I created a twitter account. Not really sure why I did. I guess no one wants to be left behind in the micro blogging world. Other than announcing that I wrote another entry on this blog, I never did anything with twitter.

Later, I stumbled on JTwitter which is a small Java library to the Twitter API. It lets you set/get your Twitter status, manage your network of friends, message friends, etc. I goofed with it for a few minutes. Example usage:
// Make a Twitter object
Twitter twitter = new Twitter("my-name","my-password");
// Print Daniel Winterstein's status
System.out.println(twitter.getStatus("winterstein"));
// Set my status
twitter.updateStatus("Messing about in Java");
Interesting. But I have no app in mind for Twitter, so JTwitter was bookmarked on Delicious for later. Today I saw on Make a cool project where a washing machine sends a message to Twitter when it's done. Pretty neat but if I hacked into my wife's LG, I'd be dead meat.

Because of Arduinos and Xbees, I've been spending lots of time on ladyada's site either buying stuff at adafruit or trying to get smarter by lurking in the forums. Ladyada seems to be alright but she has weird hair. She's pretty quick on answering forum questions and builds decent stuff. I really like her Xbee Adapter Kit.

Chris Anderson is an editor for Wired magazine. He also has a website for DIY UAVs at http://diydrones.com. Last year, I spent lots of time at his site 'cause that's something else that I want to build some day. After I read that Washing Machine Twitter thing, I read a blurb about Chris' new business model for an open source robotics startup. He says:

I'm ok with that business model but the reason I'm spinning this long story is that Chris spilled those beans via Twitter. Oh, I didn't know he had a Twitter account. I wonder what else he writes about? He writes about life and stuff. I wonder who he follows on twitter? He's the editor for Wired mag, probably follows some interesting people, huh? Sure enough, Tim O'Reilly, Phillip Torrone (Make mag), Brad Stone (NY Times), Steven Levy (found Einstein's brain, wrote Hackers, etc), and others. And Ladyada.

Ladyada's twitter status hadn't been updated in quite awhile but it was filled with entries such as:
That looked interesting as I recognized the entries as GPS strings. The National Marine Electronics Association (NMEA) has developed a specification that defines a GPS interface for the various hardware devices. NMEA also has its own version of essential GPS pvt (position, velocity, time) data. It is called RMC, the Recommended Minimum. These strings are prefaced with $GPRMC. Read all about it here.

Adafruit has a Botanicalls Twitter kit that allows plants to ask for human help via a Twitter message like "water me please" and "you over watered me". But plants don't have GPS, so I'm guessing that ladayada was messing with her Arduino GPS Shield and was logging position updates to Twitter.

I wonder where that pvt data points to? Using JTwitter, I grabbed ladayada's last status:


// Make a Twitter object
Twitter twitter = new Twitter("twitter-username","twitter-password");
// Print the lady's status
System.out.println(twitter.getStatus("ladyada"));
As expected, out pops:

$GPRMC,045519.000,A,4042.5917,N,0 7400.5417,W,0.68,290.51,160808,,* 17


In that string, the latitude is 4042.5917N. The longitude is 7400.5417W. Where is the hell is that?

Another Google search led me to a an interesting article on Sun's website, Working with Bluetooth and GPS. I grabbed the source code and parsed ladayada's string:


gps.datatypes.Record record = new gps.datatypes.Record();
System.out.println("recordtype="+
gps.parser.Parser.parse(twitter.getStatus("ladyada").getText(), record));
System.out.println("recordlat="+record.lattitude);
System.out.println("recordlon="+record.longitude);


And out pops:

recordlat=40.70986
recordlon=-74.009026

Ok, that's more like it. Somewhere in the good 'ol USA, NorthEast area. Stuff it into Google maps and sure enough, ladyada was stomping around in New York City.


What can I do with this new knowledge? I still have no app in mind but I have a few more tools to think about. And stick 'em in the shed for later use. That old shed is getting pretty full of tools for later. I better start oiling 'em before they all get rusty.

The src that I ref'd above needed some tweaking to convert the lat/lon strings to decimal degrees. I found another spot for the same code but was slightly diff in the parsing for GPRMC: Simple J2ME NMEA parser. Neither Parser was just what I needed, so I combined the two into the method below. This code is owned by Dominik Schmidt, I just modified it some.

/**
* NMEA-0183 Parser. Parses data sent by GPS receiver. As data is being
* transfered via XML to server, parsing consists in most cases of separating
* fields.
*
* @author Dominik Schmidt
*
* Copyright (C) 2006 Media Informatics Group (http://www.mimuc.de),
* University of Munich, Contact person: Enrico Rukzio
* (Enrico.Rukzio@ifi.lmu.de)
**/
public static int parse(String s, Record record)
throws UnsupportedTypeException, ParseException {

// Tokenizer to separate tokens
Tokenizer tokenizer = new Tokenizer(s);

// Type of record
int type;

try {
String token = tokenizer.next();

if (token.equals("$GPRMC")) {
type = TYPE_GPRMC;

token = tokenizer.next();
record.dateTimeOfFix = token.substring(0, 2) + ":"
+ token.substring(2, 4) + ":" + token.substring(4, 6);

record.warning = tokenizer.next().equals(Record.WARNING);

// orig version just stored lat/lon strings

// record.lattitude = tokenizer.next();
// record.lattitudeDirection = tokenizer.next();

// record.longitude = tokenizer.next();
// record.longitudeDirection = tokenizer.next();

// I used a pieces from second src to convert lat/long to decimal degrees

// Latitude
String raw_lat = tokenizer.next();
String lat_deg = raw_lat.substring(0, 2);
String lat_min1 = raw_lat.substring(2, 4);
String lat_min2 = raw_lat.substring(5);
String lat_min3 = "0." + lat_min1 + lat_min2;
float lat_dec = Float.parseFloat(lat_min3)/.6f;
float lat_val = Float.parseFloat(lat_deg) + lat_dec;

// Latitude direction
record.lattitudeDirection = tokenizer.next();

if(record.lattitudeDirection.equals("N")){
// do nothing
} else {
lat_val = lat_val * -1;
}

record.lattitude = lat_val + "";

// Longitude
String raw_lon = tokenizer.next();
String lon_deg = raw_lon.substring(0, 3);
String lon_min1 = raw_lon.substring(3, 5);
String lon_min2 = raw_lon.substring(6);
String lon_min3 = "0." + lon_min1 + lon_min2;
float lon_dec = Float.parseFloat(lon_min3)/.6f;
float lon_val = Float.parseFloat(lon_deg) + lon_dec;

// Longitude direction
record.longitudeDirection = tokenizer.next();

if(record.longitudeDirection.equals("E")){
// do nothing
} else {
lon_val = lon_val * -1;
}

record.longitude = lon_val + "";

record.groundSpeed = tokenizer.next();
record.courseMadeGood = tokenizer.next();

token = tokenizer.next();

record.dateTimeOfFix += "/" + token.substring(0, 2) + "."
+ token.substring(2, 4) + "." + token.substring(4, 6);

record.magneticVariation = tokenizer.next();

} else if (token.equals("$GPGGA")) {
type = TYPE_GPGGA;

// Time of fix
tokenizer.next();

// Lattitude
tokenizer.next();

// Lattitude direction
tokenizer.next();

// Longitude
tokenizer.next();

// Longitude direction
tokenizer.next();
record.quality = tokenizer.next();
record.satelliteCount = tokenizer.next();

// Ignore rest
}

// Type is not supported.
else {
throw new UnsupportedTypeException("Type " + token
+ " is not supported.");
}
}

// Parsing exception.
catch (NoSuchElementException e) {
throw new ParseException("Unexpected end of input.");
}
return type;
}