Santa brought my game player son a Sanyo SP2664 26-inch Widescreen LCD HD Television last Christmas. A few months into the year, the TV started getting occasional white lines diagonally across the screen, the greens looked weird, and then the audio went in/out. I could've/should've hauled it back to Wally Mart but grumbled about it and did nothing.
We came home from our July 4th vacation and the darn TV is dead. White Screen of death. No sound, just a stupid looking white screen.
An interesting thread on the Electronics Repair Google Group led my son and I to think that we could fix this beast.
According to the thread, "it has been reported that there is a defective ribbon cable that causes this problem". And the possible fix is "Clean glue like material from spaced further apart trace of FFC ribbon or replace the ribbon wire P/N: N6CD FFC".
Well, I'm pleased to report that we hacked and smashed and tore that darn TV up, finally got to the elusive cable. And it looks nothing like that picture. Our cable looked fine, no glue, seemed like a good connection. And the TV remains broken and in 300-bazillion parts.
We had fun exploring the TV but it would have been a better story if the darn thing would have actually been easy to fix. I think our TV had more wrong with it than just the cable. But if your TV is showing the white screen of death, read the link and good luck.
Showing posts with label hack. Show all posts
09 August 2010
02 May 2009
Greasemonkey Index of /images
After I posted the Yahoo Baseball Greasemonkey script, I remembered another script that I have that's worth sharing. Not my Yahoo Football Greasemonkey script which does the same as the baseball (shows in-game stats on tab title) but another more Have you ever been searching for an image or been Stumbling around and came across a page like the one to the left?
I see them quite often actually because I'm nosy and like to poke around on web sites. If I see a picture of interest, I wonder if the web site owner has others that aren't being displayed.
But here's the rub. We have a nice list but we have to click each one to see it.
Greasemonkey to the rescue.
I wrote a quick script that replaces the little icon to the left of each link with the link src. And since loading these images may be time consuming, you don't want to do this on every "Index of /" page that you come across. So we wrap that function up in a "Show Images" link at the top of the page when it completes loading.I've uploaded the script to userscripts.org where you can check it out. Install it and go to a page where you can see for yourself how it works.
Google around for "index of /images" and see what treasures abound.
I find lots of pages like this by "going up" a level on a URL. For example (not real, this is not a valid location) if you are looking at a photo:
http://somewhere.good/images/138028.jpg
Then see what's at:
http://somewhere.good/images
Either by editing the URL in the address bar or use the "up one level on this web site" button in Firefox. What, you don't know about that button? Right-Click an empty spot the tool bar and select "Customize...". Drag the icon that looks like the one I've circled below to your tool bar. Use it and discover lots of stuff.

What do you think? Leave a comment.
Baseball Better - Yahoo Greasemonkey Script
I love baseball. But you gotta admit that it can be boring "watching" a game on the web. If not watching it in person or on tv, it's kinda slow. I'm sorta ADD when cruising the web. I usually have 6 or more Firefox tabs open at once. I'm reading something, writing something, searching for something all at the same time. It's a wonder that I get anything done at all, but amazingly it works out.So if a good game is on at the same time that I'm on-line, I like to have a tab tuned into the Yahoo Sport MLB game. But the problem is that I have to keep clicking to that tab to see what's going on. I have Greasemonkey installed and have written a few other scripts to customize my viewing pleasure so hacking the box score page should be pretty easy.
Here's what the regular game looks like. Usually there's an advertisement over on the right side above the "series at glance" table. I guess times are tough at Yahoo and advertising is slow because no ad is being displayed on this screen shot.
Notice a few other things. The Firefox tab says "MLB - Kansas City Royals/M...". I'd like this to display something useful like the current in-progress game stats. Also see the Inning Summary table at the bottom. Below that is a Scoring Summary that can't be seen unless you scroll down.
So my typical game "watching" experience is every 5-10 minutes, click the tab, look at the score. If different than last time I looked, grab the scroll bar and go way down to see what happened. Way too much work.After some quick Greasemonkey hacking, I've come up with a better experience. As the page loads, I grab the team names, current score, inning, ball-strike count, runners on-base, and last play. Sounds like a lot but really it's not. Yahoo has everything in nice tables and getting it is like butter. Not really but I just felt like using that term. Just like buddah.
I take all those stats and format them into the tab so I can see the game info without having to click the tab. This alone has probably saved years of wear and tear on my mouse button.
I then replaced the advertisement block (yahoo isn't currently using it anyway) with the scoring summary so no painful scrolling occurs.For those that also want to enjoy baseball a little better, I've uploaded the script to Greasemonkey script haven.
For those that don't trust me and want to see what I've done, here's a view in the sausage factory. It ain't pretty but it works.
It's just basically screen scraping by searching for classes and then parsing data. Every time Yahoo makes a tweak, it breaks the script. I don't mind, it's usually minor.
Here we go.
Yahoo sets the page to a fixed width of 974 pixels. I run in 1280 mode so this wastes lots of valuable screen space and causes unsightly white gutters. This must be changed:
function changeWidth() {
var node = document.evaluate('//table[@width="974"]',
document,
null,
XPathResult.UNORDERED_NODE_SNAPSHOT_TYPE,
null);
node.snapshotItem(0).width="100%";
}Here's a big part of the magic. Find the table that wraps the team name and score and parse it out. The team names are long and we need shorten them so they fit it the tab nicely.function getScore() {
var scoreNode = document.evaluate(
'//td[@class="yspsctnhdln"]',
document,
null,
XPathResult.UNORDERED_NODE_SNAPSHOT_TYPE,
null);
scoreNode = (scoreNode.snapshotItem(0));
// this is ugly but I want to shorten the team so all the info displays nice on the tab
var str = scoreNode.textContent;
str = str.replace(/\n/g, "");
str = str.replace(/ /g, "");
str = str.replace(/,/g, "");
str = str.replace("Arizona", "AZ");
str = str.replace("Atlanta", "Atl");
str = str.replace("Baltimore", "Bal");
str = str.replace("Boston", "Bos");
str = str.replace("Chi Cubs", "Cub");
str = str.replace("Chi White Sox", "CWS");
str = str.replace("Cincinnati", "Cin");
str = str.replace("Cleveland", "Cle");
str = str.replace("Colorado", "Col");
str = str.replace("Detroit", "Det");
str = str.replace("Florida", "FL");
str = str.replace("Houston", "Hou");
str = str.replace("Kansas City", "KC");
str = str.replace("Minnesota", "Min");
str = str.replace("Milwaukee", "Mil");
str = str.replace("LA Angels", "LAA");
str = str.replace("LA Dodgers", "LAD");
str = str.replace("NY Mets", "Met");
str = str.replace("NY Yankees", "NYY");
str = str.replace("Oakland", "Oak");
str = str.replace("Philadelphia", "Phi");
str = str.replace("Pittsburgh", "Pit");
str = str.replace("San Diego", "SD");
str = str.replace("San Francisco", "SF");
str = str.replace("Seattle", "Sea");
str = str.replace("St. Louis", "SL");
str = str.replace("Tampa Bay", "Tam");
str = str.replace("Toronto", "Tor");
str = str.replace("Texas", "Tex");
str = str.replace("Washington", "Was");
str = str.replace(/ /g, "");
// get inning and shorten
var inning = getInning();
inning = inning.replace(/\n/g, "");
inning = inning.replace(/ /g, "");
inning = inning.replace(/Bot /g, "B");
inning = inning.replace(/Top /g, "T");
inning = inning.replace(/End /g, "E");
document.title = str + ' ' + inning + ' ' + getOut();
}In the above code, I didn't put a comment on this line but this is where the Firefox tab gets the in-game stats:document.title = str + ' ' + inning + ' ' + getOut();And more parsing. And then some really ugly if-else code. Kinda embarrassing that I did this. But I did and I'm too lazy to re-write.
function getOut() {
var balls = document.evaluate("//*[contains(.,'O:')]/b",
document, null, XPathResult.FIRST_ORDERED_NODE_TYPE, null).singleNodeValue;
var count = "";
if (balls) {
var n= balls.nextSibling;
var strikes = n.nextSibling;
n = strikes.nextSibling;
var outs= n.nextSibling;
count = balls.innerHTML + '-' + strikes.innerHTML + ' O:'+ outs.innerHTML;
}
// find how many men are on base.
// do this by looking at what image is being displayed.
// yeah, I need to clean this up but it works and I don't have time. go for it
var men = document.evaluate("//img[contains(@src,'tr_empty.gif')]",
document, null, XPathResult.FIRST_ORDERED_NODE_TYPE, null).singleNodeValue;
if (men) {
men = "empty";
}
else {
men = document.evaluate("//img[contains(@src,'tr_1b.gif')]",
document, null, XPathResult.FIRST_ORDERED_NODE_TYPE, null).singleNodeValue;
if (men) {
men = "1b";
}
else {
men = document.evaluate("//img[contains(@src,'tr_2b.gif')]",
document, null, XPathResult.FIRST_ORDERED_NODE_TYPE, null).singleNodeValue;
if (men) {
men = "2b";
}
else {
men = document.evaluate("//img[contains(@src,'tr_3b.gif')]",
document, null, XPathResult.FIRST_ORDERED_NODE_TYPE, null).singleNodeValue;
if (men) {
men = "3b";
}
else {
men = document.evaluate("//img[contains(@src,'tr_1b2b.gif')]",
document, null, XPathResult.FIRST_ORDERED_NODE_TYPE, null).singleNodeValue;
if (men) {
men = "1b2b";
}
else {
men = document.evaluate("//img[contains(@src,'tr_1b3b.gif')]",
document, null, XPathResult.FIRST_ORDERED_NODE_TYPE, null).singleNodeValue;
if (men) {
men = "1b3b";
}
else {
men = document.evaluate("//img[contains(@src,'tr_2b3b.gif')]",
document, null, XPathResult.FIRST_ORDERED_NODE_TYPE, null).singleNodeValue;
if (men) {
men = "2b3b";
}
else {
men = document.evaluate("//img[contains(@src,'tr_full.gif')]",
document, null, XPathResult.FIRST_ORDERED_NODE_TYPE, null).singleNodeValue;
if (men) {
men = "full";
}
else {
men = "";
}
}
}
}
}
}
}
}
return count + ' ' + men;
}And that's about it. Take a look at the file at userscripts.org and give it a try. Let me know if you've improved and found some bugs.What do you think? Leave a comment.
22 March 2009
tweet-a-whatever (tweet-a-w/e) foundation
My explanation of the tweet-a-w/e ran pretty long in my last post. I took an Asus wl-520gu wireless router, installed OpenWrt, Python, and an Xbee to build the foundation of a tweet-a-whatever (tweet-a-w/e). My 13 year-old texting obsessed daughter choose that name BTW. The last post ran so long that I cut it off after I talked about how to read the serial port with pySerial.This time, I'll explain a simple Python app that receives a string from a Xbee, decodes its header and then tweets the payload to a twitter account. I'm a complete Python newb so if you have suggestions on a better implementation, I'm all ears.
Here's basically what I've done. Heavily borrowed from mightyOhm and ladyada, this project receives data from Xbees in "the field". Using a unique header, the client app determines the payload destination which can be a tweet or a web service.Mr mightyOhm has written a great series on hacking the Asus wl-520gu wireless router to build an open source wireless streaming internet radio receiver. If you haven't read thru Jeff's work, stop right now and read it. Now.
Ladyada's award winning tweet-a-watt takes data from a kill-a-watt, sends it to Xbee embedded in a hacked wl-520gu and then tweets it for the world to see how green you are. I've copied the Xbee connection from her and the idea of using Python. She didn't post her Python source, so I've had to stumble thru this. I just read tonite, that the tweet-a-watt project will be a project in Make Magazine, volume 18. [update] ladyada did post her source, I just missed it. Check out her good stuff here.
My tweet-a-w/e's spin is that any data generating thing (a "whatever") can be hooked to an Xbee in the field. Either directly to the Xbee or via an Arduino. The Xbee transmits to a receiving Xbee that has been wired into the serial port of a hacked Asus wl-520gu. The Python app running on the router reads the data and based on a unique header code, the payload is either tweeted or sent to a web service.
So I ended last time by showing a small snippet of Python that read the incoming data and printed it. Now let's modify that snip so it reads the first few characters and makes a decision of what to do. This first revision is pretty hackish and we'll improve on it as "whatevers" are added in the field. My opinion is get it working, then optimize.
Last time we installed Python but I didn't tell about the python-twitter wrapper from DeWitt Clinton. Here's what I did:
- Install simple JSON dependency
- wget http://pypi.python.org/packages/source/s/simplejson/simplejson-2.0.9.tar.gz
- gunzip simplejson-2.0.9.tar.gz
- tar xvf simplejson-2.0.9.tar
- python setup.py install
Mr Google has no clue about this error. Plenty of problems, but I couldn't find anything. I mucked with my LD_LIBRARY_PATH and considered rebuilding Python. Finally, I actually started looking at the source referenced in the trace. Here's what I found. Install OpenSSL and problems are solved. I wrote about my fun here.
# opkg updateAnd finally install python-twitter:
# opkg install openssl-util
- wget http://python-twitter.googlecode.com/files/python-twitter-0.5.tar.gz
- gunzip python-twitter-0.5.tar.gz
- tar xvf python-twitter-0.5.tar
- python setup.py install
I'm currently planning 4 whatevers that will be talking to the router:
- Xbee connected to my laptop via a SparkFun Xbee Explorer USB
- Maxim DS18B20 1-wire temperature sensor connected to an Arduino and an Xbee
- Nike+ receiver in a Serial Adapter connected to an Arduino and an Xbee
- Xbee in ADC (Analog-to-digital conversion) and digital I/O line passing.
I created an array to hold the whatever name, the unique header, the action to perform, and username/password:
# tweet-a-w/e stuff array # "whatever", header string, action, user, password # WE_ARRAY = [ ['WE_TEST', '[0]', _tweet_it, 'username', 'password'], ['WE_TEMPERATURE', '[1]', _web_it, 'username2', 'password'], ['WE_NIKEPLUS', '[2]', _stalk_it, 'username3', 'password'], ['WE_XBEE', '0x7e', _tweet_it, 'username4', 'password'] ]The action array elements are functions to perform the tweet or web action. Here's what I defined:
# # define functions to do something with received data # # tweet data # def _tweet_it(data, twuser, twpass): # login to twitter print 'tweet w/' + twuser api = twitter.Api(username=twuser, password=twpass) api.PostUpdate(data) # web service data # def _web_it(data, twuser, twpass): # tbd print 'wrote to web service w/' + twuser # stalk the data # def _stalk_it(data, twuser, twpass): # tbd print 'watch it w/' + twuserOk, now let's read the data and determine what we got:
# open up the serial port on router # print 'opening serial port ' + SERIALPORT ser = serial.Serial(SERIALPORT, BAUDRATE, timeout=TIMEOUT) ser.open() # read data # try: print 'entering read loop' # loop forever while 1: # read it from serial port data = ser.read(NUMCHARS) if len(data) > 0: print 'Read: ' + data # loop thru our whatever array and see if we recognize the header for i in range(0, len(WE_ARRAY)-1): if data.startswith(WE_ARRAY[i][1]): print WE_ARRAY[i][0] + " action " + WE_ARRAY[i][2].__name__ WE_ARRAY[i][2](data, WE_ARRAY[i][3], WE_ARRAY[i][4]) break finally: print 'closing serial port' ser.closeThe only tricky thing in that code is the action call. Once we have a header match, the 2nd array element is one of the action functions that we defined. Simply call it and pass the data, username/password as arguments.
My Python client file is here.
Get your file on the router and start it:
root@OpenWrt:/opt/project# python XbeeReader.pyAnd send it something. For me, a quick test is to use another Xbee in the SparkFun Xbee Explorer. When I plug this in to my laptop, it shows up as /dev/ttyUSB0 so to write a quick string is as simple as:
d@hopper:~/projects/wl-520gu$ echo "[0] Testing " + `date` > /dev/ttyUSB0And on the router telnet window, I see:
opening serial port /dev/tts/0I'm using a test twitter account and viola, the string "[0] Testing" shows up like magic.
entering read loop
Read: [0] Testing + Thu Mar 26 23:30:47 EDT 2009
WE_TEST action _tweet_it
tweet w/skibicki
How are the Xbees configured? Real easy. I put ZNET 2.5 Router / End Device AT firmware version 1244 on both. I use Linux so using X-CTU was a little tricky until I figured out how to use it with Wine. I wrote about it here.
The Xbee in the router is named PINK. Last year, I built the NKC Xbee Shield Kit and goofed something up. When I installed the Xbee, it got really hot and the white Xbee label turned pink. It still works but is discolored. Here's the X-CTU file for PINK.
The Xbee connected to my laptop via the Xbee Explorer is named WHITE. Because it's not discolored. The config is EXACTLY same as PINK except for the name and destination. After loading the ZNET 2.5 Router / End Device AT firmware, I went to the X-CTU Terminal tab and typed:
+++Here's the X-CTU file for WHITE.
ATNI WHITE
ATDN PINK
ATWR
Plans for next time. Clean up the client so only the data is written to twitter and not the unique header. Then hook up the DS18B20 temperature sensor and start tweeting real data.
What do you think? Leave a comment.
21 March 2009
tweet-a-w/e using Asus wl-520gu and Xbee
---------------------------------------------------------------------------------------------
A few of the geeks that I
Mr mightyOhm is also the admin of the Asus Wireless Router Hacks Flickr Pool. Check out a few of the cool things he and others have done with the wl-520gu.
I've been thinking about a tweet-a-temperature project that would monitor my pool temperature and tweet it every so often during the summer months. While I'm toiling away in the office, I could get SMS spam telling how great life is outside work.
Let's lay down the foundation for a tweet-a-whatever (tweet-a-w/e) project by hooking an Xbee to the router and installing a Python client that tweets whatever is received.
Yes, this seems to be very similar to ladyada's tweet-a-watt port. I'm shamelessly copying the hard work of mightyOhm and adafruit to set this up. What's my value-add? I'll ramble a lot and tell you about all my dead-ends.
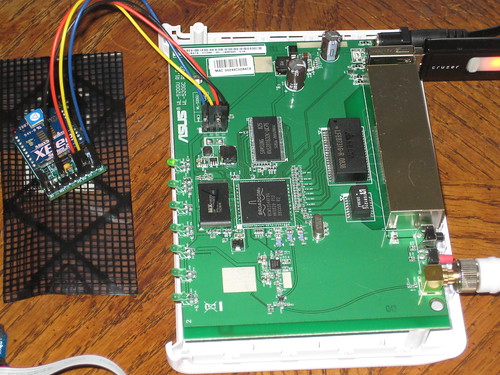
So I ordered a wl-520gu from newegg and eventually pretty much followed mightyOhm's instruction for installing header pins on the serial port and installing OpenWrt.
If you've read any of my other ramblings on this blog, you know already that I'm not very original and sometimes not very smart. But I'm decent at
Let's first talk about the stupid things I did so you can avoid the mistakes in life that I have made.
- Both mightyOhm and ladyada used OpenWrt by first flashing dd-wrt and then OpenWrt. Me? I choose to use tomato firmware instead because I wanted built-in USB support and the description of its feature sounded great. And because I wanted to waste 3 nights trying to configure it in wireless client mode. I'm not saying tomato is bad, I'm just saying that I struggled big time and I couldn't find many online tips. I finally said "uncle" and followed the mightyOhm's way and installed openWrt. And had it working in under a half-hour.
- Installing a four-pin header isn't a hard thing. All I had to do was remove 4 blobs of solder and then solder in a header. So ... Why did I somehow brick my router? I was super duper careful removing the blobs (without a de-solder-er iron or a bulb) and then was careful soldering in the pins. I only applied heat for a max of 5 seconds and let it cool for about 5-10 seconds before re-attempting. Yet I did it. After I finished the header, the darn thing wouldn't boot. Nothing, dead to the world. No reset, no LED action, nada. I cussed for a day or two and then ordered a new one from newegg. Before I de-blobbed the new one, I ran down to Rat Shack and bought a desoldering bulb. 20 minutes later, I had a working router - with header pins. Lesson? If at first you don't succeed, spend more money.
- With the default Asus firmware still installed, I found that logging in via telnet, the user/password was root/admin. Via the browser at 192.168.1.1:80, the user/password was admin/admin. Kinda odd, but maybe this tip will save you some hair.
On the 1st router that I bricked, I installed new firmware first, then tried to install the headers. On my working router, I did headers first, then firmware. I don't think it really matters what order you do this. But I ruined a $59 router, so you trusting me?
So do your own thing and follow mightyOhm's excellent instructions. Get headers on the serial port, install openWrt, and meet me back here in a few.
Yeah, I know the picture over there is kinda blurry but it's the best camera I have (donations accepted). If the picture was clear, you would see that I'm using a USB TTL-232 cable to talk to the router from a USB port to the router's shiny new headers. mightyOhm's picture on this page was very helpful for the pin-outs.
As is, the OpenWrt's filesystem is pretty cramped. There's not much space available to install extras such as Python. I had an extra Sandisk Cruzer laying around so I setup the router to automount the USB stick on /opt.
From either the serial line or a wireless telnet (my preference),
- Edit opkg config file to use kamikazi 8.09 packages.
- # vi /etc/opkg.conf
- Set the first line to this:
- src/gz snapshots http://downloads.openwrt.org/kamikaze/8.09/brcm-2.4/packages
- # opkg update
- # opkg install kmod-usb-core
- # opkg install kmod-usb-ohci
- # opkg install kmod-usb-storage
- # opkg install kmod-fs-vfat
- # opkg install kmod-fs-ext3
I want to install Python libraries and other extras on the USB drive so we'll need this auto-mounted at boot time. I couldn't locate clear instructions on this but here's what worked for me. Using tips from this place, I did:
- Create a mount point
- # mkdir /opt
- Create an /etc/rc.d/S11mount file with macsat.com contents from this page.
- NOTE: macsat's page references this as /etc/init.d/S11mount. For my version to work, I did not put it in init.d but instead put it in rc.d
- # vi /etc/rc.d/S11mount
- Paste in macsat's example S11mount content. My file version can be found here.
- change the MOUNT_DEVICE0 statement to match your device. My USB stick was exactly the same as his example.
- Edit opkg config file to create an alternative destination for packages
- # vi /etc/opkg.conf
- Add this line:
- dest opt /opt
- My copy of the opkg.conf file is here.
- export PATH=/bin:/sbin:/usr/bin:/usr/sbin:/opt/bin:/opt/sbin:/opt/usr/bin:/opt/usr/sbin
- export LD_LIBRARY_PATH=/lib:/usr/lib:/opt/usr/lib:/opt/lib
At this point, we have a flashed wl-520gu router with OpenWrt, headers soldered to serial port, and configured to mount a USB stick to opt at bootup. Let's keep mushing on.
The line that we added to the top of our opkg.conf file
- src/gz snapshots http://downloads.openwrt.org/kamikaze/8.09/brcm-2.4/packages
- # opkg update
- # opkg -d opt install python
- # python -V
Python 2.5.4
Since OpenWrt uses the serial port /dev/tts for console login, we need to modify the /etc/inittab file. All this takes is to comment out the tts line:
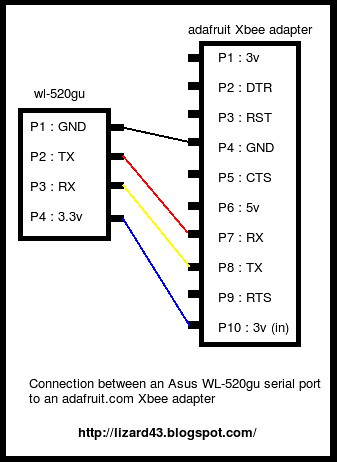
- wl-520gu GND -> Xbee GND
- wl-520gu 3V -> Xbee 3V
- wl-520gu TX -> Xbee RX
- wl-520gu RX -> Xbee TX
#tts/0::askfirst:/bin/ash --login
I'm using Python for the client app, so we need to install the pySerial module from SourceForge. Create a temp folder on /opt, CD to it, download pySerial, unzip, untar, and install
- # mkdir /opt/temp
- # cd /opt/temp
- # wget http://downloads.sourceforge.net/pyserial/pyserial-2.4.tar.gz
- # gunzip pyserial-2.4.tar.gz
- # tar xvf pyserial-2.4.tar
- # python setup.py install
reader.py
I've modified the reader.py quite a bit so that it tweets the received data, but the version above simply echoes the data to the terminal.
#!/usr/bin/env python import serial, time SERIALPORT = "/dev/tts/0" # the com/serial port the XBee is connected to BAUDRATE = 9600 # the baud rate we talk to the xbee TIMEOUT = 0.5 # the timeout to wait for buffer fill NUMCHARS = 140 # the number of characters to attempt to read at once # open up the FTDI serial port to get data transmitted to xbee print 'opening serial port ' + SERIALPORT ser = serial.Serial(SERIALPORT, BAUDRATE, timeout=TIMEOUT) ser.open() try: print 'entering read loop' while 1 > 0: data = ser.read(NUMCHARS) if len(data) > 0: print "Read " + data finally: print 'closing serial port' ser.close
Run it like this:
# python reader.pySend the Xbee data from another Xbee and watch it print.
Alright, I'm stopping and will pick up the story in my next entry. Look at this picture to see where we're going.

- Update: I've wrapped up this story in tweet-a-w/e foundation
What do you think? Leave a comment.
24 January 2009
Seven-Segment Vacuum Fluorescent Display (VFD)
My current area had a junkier place called Misener Electronics, formerly Pembleton Electronics, that has potential but they keep moving locations and they may be gone for good. Current rumour is that they moved from the Volleyball Courts to 500 Coombs Street. No one answers the phone and I drove by the empty looking building today. I think we've lost the only electronic junk store in town.When Misener was open last year, I found a box of an interesting FIP (Fluorescent Indicator Panel or Vacuum Fluorescent Display (VFD)) for about 25¢ each. I grabbed a handful and added to my junk pile. These look pretty nice but what can I do with 'em? Any idea how to drive them? I started Googling the part number and few a limited number of hits. Part number NEC FIP6C15A at least reveals these specs but doesn't give any pinouts.
| NEC Electronics FIP6C15A Seven-Segment Vacuum Fluorescent Display - 7-Segment Numeric Package Style (Basic)=SIP Color=Blue-Green Number of Digits=6 Character Height (mm)=15 Vsup Nom.(V) Supply Voltage=3.7 Iseg (A) Segment Forward Cur.=150m Lv Typ.(fL) Luminance=700 Package=SIP |
Using the ATX PSU that I put in test mode, I applied +3.3VDC across the filaments (on this VFD, the two out side pins that I labeled as Element for some dumb reason), and then randomly picked a grid (which is one of the leads not below one of the yellow blocks on the back) and stuck +12VDC on it. Then applied +12VDC to various segments which are the pins below the yellow blocks.
This was pretty cool but obvious that it would be tough to control this with an Arduino to make it a useful display. A Maxim's Application Note 1154 lists VFD Tube Manufacturers' Web Sites. In that appnote is a list of Maxim tube driver chips that would be great for interfacing to my VFD. The MAX6934 looks about right.
20 January 2009
PC Power Supply for the Lab Bench
Seems like everyone has converted an old PC Power Supply for use in the lab. I've been using old wall warts for most of what I need so I haven't really paid much attention to the weekly instructable or hack that gives the step-by-steps. I admit, it sounds great. Plug in the supply and you have instant regulated +3.3VDC, +5VDC, +12VDC, -12VDC, -5VDC, and +5VSB. Yup, sounds great.Wait. +5VSB, what's that? It's the 5 Volt Standby voltage. It's the voltage that remains running when the power supply suspends and is used to power the "wake on" devices such as network cards and modems used to bring the computers out of suspend mode. It's been around on PSUs for quite some time, I guess just haven't noticed it.
Since the wall warts are ok for me, why am I writing about a PSU? Because Spoofee told me about a dirt cheap one. Buy it, rebate, and it's almost free! I love almost free 'cause it's really cheap. Okay, I did the buy and rebate thing and now have a PSU sitting on the bench. I guess the instructables are needed.

But first a warning. All I'm doing here is simply putting the PSU into a test mode so I can vampire the juice from a connector. Although the volts are regulated, the current can zap the crap out of your circuit if you short something. Check out the instructable above to see how you can do this better. Read the comments to that instructable to see the many cons on using a PSU for your project. I'm lazy and just want quick power to run a VFD that I'll blog about soon. You, are not lazy and will do this better. If you do this to a PSU, be careful.
Here's a real decent pin-out that I found at Help With PCs. I especially like the color coding 'cause it helps my old eye find the right volt pin quickly.The Ultra X-Connect PSU that I have has a ATX 2-pin, 6-pin Xeon, 4-pin Pentium 4, and five 4-pin Molex connectors.
A problem with ATX PSUs, they won't power up without the Main Power connector being hooked up. To power up an ATX or ATX-2 PSU for testing, short pin 14 (PS_ON) with one of the grounds.
I just stuck a wire in the 20-pin main power connector and shorted pin 14 (PS_ON) to pin 15 (GND). Just like that pic over on the right.The PSU rumbled to a start and viola, free power. VFD, here I come.
Subscribe to:
Posts (Atom)