Showing posts with label wl-520gu. Show all posts

22 March 2009

tweet-a-whatever (tweet-a-w/e) foundation

My explanation of the tweet-a-w/e ran pretty long in my last post. I took an Asus wl-520gu wireless router, installed OpenWrt, Python, and an Xbee to build the foundation of a tweet-a-whatever (tweet-a-w/e). My 13 year-old texting obsessed daughter choose that name BTW. The last post ran so long that I cut it off after I talked about how to read the serial port with pySerial.

This time, I'll explain a simple Python app that receives a string from a Xbee, decodes its header and then tweets the payload to a twitter account. I'm a complete Python newb so if you have suggestions on a better implementation, I'm all ears.

Here's basically what I've done. Heavily borrowed from mightyOhm and ladyada, this project receives data from Xbees in "the field". Using a unique header, the client app determines the payload destination which can be a tweet or a web service.

Mr mightyOhm has written a great series on hacking the Asus wl-520gu wireless router to build an open source wireless streaming internet radio receiver. If you haven't read thru Jeff's work, stop right now and read it. Now.

Ladyada's award winning tweet-a-watt takes data from a kill-a-watt, sends it to Xbee embedded in a hacked wl-520gu and then tweets it for the world to see how green you are. I've copied the Xbee connection from her and the idea of using Python. She didn't post her Python source, so I've had to stumble thru this. I just read tonite, that the tweet-a-watt project will be a project in Make Magazine, volume 18. [update] ladyada did post her source, I just missed it. Check out her good stuff here.

My tweet-a-w/e's spin is that any data generating thing (a "whatever") can be hooked to an Xbee in the field. Either directly to the Xbee or via an Arduino. The Xbee transmits to a receiving Xbee that has been wired into the serial port of a hacked Asus wl-520gu. The Python app running on the router reads the data and based on a unique header code, the payload is either tweeted or sent to a web service.

So I ended last time by showing a small snippet of Python that read the incoming data and printed it. Now let's modify that snip so it reads the first few characters and makes a decision of what to do. This first revision is pretty hackish and we'll improve on it as "whatevers" are added in the field. My opinion is get it working, then optimize.

Last time we installed Python but I didn't tell about the python-twitter wrapper from DeWitt Clinton. Here's what I did:
  • Install simple JSON dependency
  • wget http://pypi.python.org/packages/source/s/simplejson/simplejson-2.0.9.tar.gz
  • gunzip simplejson-2.0.9.tar.gz
  • tar xvf simplejson-2.0.9.tar
  • python setup.py install
And crash. Some weird error about "No module named _md5". WTFO?

Mr Google has no clue about this error. Plenty of problems, but I couldn't find anything. I mucked with my LD_LIBRARY_PATH and considered rebuilding Python. Finally, I actually started looking at the source referenced in the trace. Here's what I found. Install OpenSSL and problems are solved. I wrote about my fun here.
# opkg update
# opkg install openssl-util
And finally install python-twitter:
  • wget http://python-twitter.googlecode.com/files/python-twitter-0.5.tar.gz
  • gunzip python-twitter-0.5.tar.gz
  • tar xvf python-twitter-0.5.tar
  • python setup.py install
Woo hoo. We're ready to tweet.

I'm currently planning 4 whatevers that will be talking to the router:
Each whatever will be uniquely ID'd so the incoming data can be routed to a twitter acount or any other web resource. Because my originality lacks, I started with "[0]" for the test Xbee on my laptop, "[1]" for the temperature sensor, "[2]" for the Nike+, and "ox7e" for the Xbee.

I created an array to hold the whatever name, the unique header, the action to perform, and username/password:
# tweet-a-w/e stuff array
#   "whatever", header string, action, user, password
#
WE_ARRAY = [
['WE_TEST', '[0]', _tweet_it, 'username', 'password'],
['WE_TEMPERATURE', '[1]', _web_it, 'username2', 'password'],
['WE_NIKEPLUS', '[2]', _stalk_it, 'username3', 'password'],
['WE_XBEE', '0x7e', _tweet_it, 'username4', 'password']
]
The action array elements are functions to perform the tweet or web action. Here's what I defined:
#
# define functions to do something with received data
#

# tweet data
#
def _tweet_it(data, twuser, twpass):
# login to twitter
print 'tweet w/' + twuser
api = twitter.Api(username=twuser, password=twpass)
api.PostUpdate(data)

# web service data
#
def _web_it(data, twuser, twpass):
# tbd
print 'wrote to web service w/' + twuser

# stalk the data
#
def _stalk_it(data, twuser, twpass):
# tbd
print 'watch it w/' + twuser
Ok, now let's read the data and determine what we got:
# open up the serial port on router
#
print 'opening serial port ' + SERIALPORT
ser = serial.Serial(SERIALPORT, BAUDRATE, timeout=TIMEOUT)
ser.open()

# read data
#
try:
print 'entering read loop'

# loop forever
while 1:

# read it from serial port
data = ser.read(NUMCHARS)
if len(data) > 0:
print 'Read: ' + data

# loop thru our whatever array and see if we recognize the header
for i in range(0, len(WE_ARRAY)-1):
if data.startswith(WE_ARRAY[i][1]):
print WE_ARRAY[i][0] + " action " + WE_ARRAY[i][2].__name__
WE_ARRAY[i][2](data, WE_ARRAY[i][3], WE_ARRAY[i][4])
break

finally:
print 'closing serial port'
ser.close
The only tricky thing in that code is the action call. Once we have a header match, the 2nd array element is one of the action functions that we defined. Simply call it and pass the data, username/password as arguments.

My Python client file is here.

Get your file on the router and start it:
root@OpenWrt:/opt/project# python XbeeReader.py
And send it something. For me, a quick test is to use another Xbee in the SparkFun Xbee Explorer. When I plug this in to my laptop, it shows up as /dev/ttyUSB0 so to write a quick string is as simple as:
d@hopper:~/projects/wl-520gu$ echo "[0] Testing " + `date` > /dev/ttyUSB0
And on the router telnet window, I see:
opening serial port /dev/tts/0
entering read loop
Read: [0] Testing + Thu Mar 26 23:30:47 EDT 2009
WE_TEST action _tweet_it
tweet w/skibicki
I'm using a test twitter account and viola, the string "[0] Testing" shows up like magic.

How are the Xbees configured? Real easy. I put ZNET 2.5 Router / End Device AT firmware version 1244 on both. I use Linux so using X-CTU was a little tricky until I figured out how to use it with Wine. I wrote about it here.

The Xbee in the router is named PINK. Last year, I built the NKC Xbee Shield Kit and goofed something up. When I installed the Xbee, it got really hot and the white Xbee label turned pink. It still works but is discolored. Here's the X-CTU file for PINK.

The Xbee connected to my laptop via the Xbee Explorer is named WHITE. Because it's not discolored. The config is EXACTLY same as PINK except for the name and destination. After loading the ZNET 2.5 Router / End Device AT firmware, I went to the X-CTU Terminal tab and typed:
+++
ATNI WHITE
ATDN PINK
ATWR
Here's the X-CTU file for WHITE.

Plans for next time. Clean up the client so only the data is written to twitter and not the unique header. Then hook up the DS18B20 temperature sensor and start tweeting real data.

What do you think? Leave a comment.

21 March 2009

tweet-a-w/e using Asus wl-520gu and Xbee

Update: Newegg no longer stocks the Asus WL-520GU router but this is still a cool project. You can find these routers for $10-20 (or more) on eBay. Also someone sent me a comment that the Linksys WRT54G routers have serial ports that could be used in a similar manner. I haven't tried this yet but if a cheap Linksys router comes my way, I'll try and attempt to blog about it.
---------------------------------------------------------------------------------------------
A few of the geeks that I stalk follow on twitter have done some interesting things with the Asus wl-520gu wireless router. Jeff Keyzer of mightyOhm has a real nice series on using the router where he builds an open source wireless streaming internet radio receiver. He walks you step-by-step on why he chose the wl-520gu, how to load OpenWrt, adding a serial port header, and even interfacing it to an Atmel ATmega168 AVR microcontroller to drive an LCD. Very nice, thanks Jeff.

Mr mightyOhm is also the admin of the Asus Wireless Router Hacks Flickr Pool. Check out a few of the cool things he and others have done with the wl-520gu.

Not to be out done, LadyAda hacked her 520gu and ported her tweet-a-watt xBee code in a 5 hour hack fest. That's her router picture over on the right. Click it and see a brief description of her efforts. She mentions this project on twitter and on flicker but I haven't seen it on her blog. I've been messing with Xbees lately and ladyada's hack is just what i need.

I've been thinking about a tweet-a-temperature project that would monitor my pool temperature and tweet it every so often during the summer months. While I'm toiling away in the office, I could get SMS spam telling how great life is outside work.

Or maybe a tweet-a-lert that let's me know when my super-sekret door has been opened. Or a tweet-a-stalk when a victim with Nike+ shoes runs by a sensor.

Let's lay down the foundation for a tweet-a-whatever (tweet-a-w/e) project by hooking an Xbee to the router and installing a Python client that tweets whatever is received.

Yes, this seems to be very similar to ladyada's tweet-a-watt port. I'm shamelessly copying the hard work of mightyOhm and adafruit to set this up. What's my value-add? I'll ramble a lot and tell you about all my dead-ends.


We'll take a wl-520gu router, install openWrt firmware and configure it as a wireless client to my existing house wireless network. Using the 520gu's serial port, I'll hook up an Xbee in an Adafruit adapter. Next, install Python on an automount USB drive and write a client that reads incoming Xbee data and does the tweet.

So I ordered a wl-520gu from newegg and eventually pretty much followed mightyOhm's instruction for installing header pins on the serial port and installing OpenWrt.

If you've read any of my other ramblings on this blog, you know already that I'm not very original and sometimes not very smart. But I'm decent at stealing reusing other people's work and twisting it to fit my needs.

Let's first talk about the stupid things I did so you can avoid the mistakes in life that I have made.
  • Both mightyOhm and ladyada used OpenWrt by first flashing dd-wrt and then OpenWrt. Me? I choose to use tomato firmware instead because I wanted built-in USB support and the description of its feature sounded great. And because I wanted to waste 3 nights trying to configure it in wireless client mode. I'm not saying tomato is bad, I'm just saying that I struggled big time and I couldn't find many online tips. I finally said "uncle" and followed the mightyOhm's way and installed openWrt. And had it working in under a half-hour.
  • Installing a four-pin header isn't a hard thing. All I had to do was remove 4 blobs of solder and then solder in a header. So ... Why did I somehow brick my router? I was super duper careful removing the blobs (without a de-solder-er iron or a bulb) and then was careful soldering in the pins. I only applied heat for a max of 5 seconds and let it cool for about 5-10 seconds before re-attempting. Yet I did it. After I finished the header, the darn thing wouldn't boot. Nothing, dead to the world. No reset, no LED action, nada. I cussed for a day or two and then ordered a new one from newegg. Before I de-blobbed the new one, I ran down to Rat Shack and bought a desoldering bulb. 20 minutes later, I had a working router - with header pins. Lesson? If at first you don't succeed, spend more money.
  • With the default Asus firmware still installed, I found that logging in via telnet, the user/password was root/admin. Via the browser at 192.168.1.1:80, the user/password was admin/admin. Kinda odd, but maybe this tip will save you some hair.
Okay, so where are we in this story? Oh yeah, the start. Buy a wl-520gu router and boot it up fresh from the box. Don't muck with anything yet. Confirm that it starts and you can log in via a wired ethernet cable on a LAN port. The default address, username, password are on the bottom of the router (192.168.1.1, admin, admin).

On the 1st router that I bricked, I installed new firmware first, then tried to install the headers. On my working router, I did headers first, then firmware. I don't think it really matters what order you do this. But I ruined a $59 router, so you trusting me?

So do your own thing and follow mightyOhm's excellent instructions. Get headers on the serial port, install openWrt, and meet me back here in a few.

Back already? Good, you should have a router with OpenWrt that acts like a wireless client on your network. You should be able to wirelessly connect via telnet as well as via the serial port.

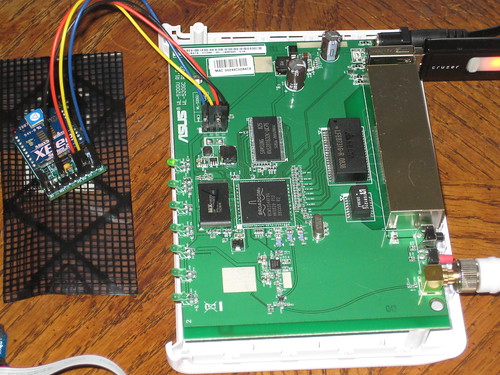
Yeah, I know the picture over there is kinda blurry but it's the best camera I have (donations accepted). If the picture was clear, you would see that I'm using a USB TTL-232 cable to talk to the router from a USB port to the router's shiny new headers. mightyOhm's picture on this page was very helpful for the pin-outs.

As is, the OpenWrt's filesystem is pretty cramped. There's not much space available to install extras such as Python. I had an extra Sandisk Cruzer laying around so I setup the router to automount the USB stick on /opt.

From either the serial line or a wireless telnet (my preference),
Then using hints from the openWrt wiki, I executed these commands:
  • # opkg update
  • # opkg install kmod-usb-core
  • # opkg install kmod-usb-ohci
  • # opkg install kmod-usb-storage
  • # opkg install kmod-fs-vfat
  • # opkg install kmod-fs-ext3
I installed both vfat and ext3 because my USB stick was currently fat but I wanted to reformat it to ext3. That should be pretty simple to do but as with most things, it was a hassle. I finally found how to do it and did this (click the link).

I want to install Python libraries and other extras on the USB drive so we'll need this auto-mounted at boot time. I couldn't locate clear instructions on this but here's what worked for me. Using tips from this place, I did:
  • Create a mount point
  • # mkdir /opt
  • Create an /etc/rc.d/S11mount file with macsat.com contents from this page.
  • NOTE: macsat's page references this as /etc/init.d/S11mount. For my version to work, I did not put it in init.d but instead put it in rc.d
  • # vi /etc/rc.d/S11mount
  • Paste in macsat's example S11mount content. My file version can be found here.
  • change the MOUNT_DEVICE0 statement to match your device. My USB stick was exactly the same as his example.
We're really making progress now. Next, we want to setup opkg so we can install large packages such as Python to the USB. Again, I'm using tidbit's from macsat.com excellent pages. Here's the good stuff.
  • Edit opkg config file to create an alternative destination for packages
  • # vi /etc/opkg.conf
  • Add this line:
  • dest opt /opt
  • My copy of the opkg.conf file is here.
Now some housekeeping. Since we want to install libraries and stuff on the USB stick, we'll need to continue following macsat's advice and update PATH and LD_LIBRARY_PATH in your /etc/profile. I set mine to:
  • export PATH=/bin:/sbin:/usr/bin:/usr/sbin:/opt/bin:/opt/sbin:/opt/usr/bin:/opt/usr/sbin
  • export LD_LIBRARY_PATH=/lib:/usr/lib:/opt/usr/lib:/opt/lib
If you'll be installing services on /opt that you want to start at system boot time, be sure to check out macsat's script here. I'll be using this after I complete the client app. For now, I'm just manually starting.

At this point, we have a flashed wl-520gu router with OpenWrt, headers soldered to serial port, and configured to mount a USB stick to opt at bootup. Let's keep mushing on.

The line that we added to the top of our opkg.conf file
sets us up to install from the kamikaze 8.09 packages which contain the Python 2.5 that I seek. Do this to install Python on the opt mount:
  • # opkg update
  • # opkg -d opt install python
Assuming that you haven't fallen asleep and you've setup your route similar to mine, after a few minutes, Python and all dependencies will be safely setup on /opt. Give it a try:
  • # python -V
And you should see the proof:
Python 2.5.4
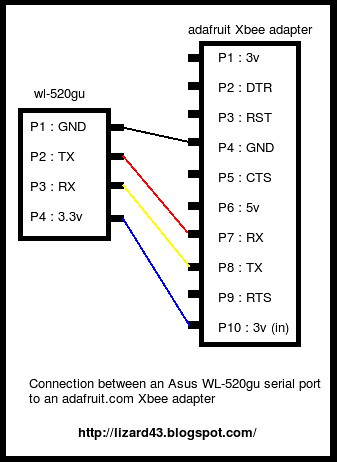
Using the AdaFruit Xbee Adapter that I blogged about last year, the next step is to simply hook it up to the 4-pin serial headers. This is the easiest step of all. 4 wires, hook 'em up.
  • wl-520gu GND -> Xbee GND
  • wl-520gu 3V -> Xbee 3V
  • wl-520gu TX -> Xbee RX
  • wl-520gu RX -> Xbee TX
Since OpenWrt uses the serial port /dev/tts for console login, we need to modify the /etc/inittab file. All this takes is to comment out the tts line:

#tts/0::askfirst:/bin/ash --login

I'm using Python for the client app, so we need to install the pySerial module from SourceForge. Create a temp folder on /opt, CD to it, download pySerial, unzip, untar, and install
All we need now is a app that reads the serial port and tweets. This blog getting pretty long so I'll just explain the serial port read and talk about the tweet part next time.

reader.py

#!/usr/bin/env python
import serial, time

SERIALPORT = "/dev/tts/0"     # the com/serial port the XBee is connected to
BAUDRATE = 9600               # the baud rate we talk to the xbee
TIMEOUT = 0.5                 # the timeout to wait for buffer fill
NUMCHARS = 140                # the number of characters to attempt to read at once

# open up the FTDI serial port to get data transmitted to xbee
print 'opening serial port ' + SERIALPORT
ser = serial.Serial(SERIALPORT, BAUDRATE, timeout=TIMEOUT)
ser.open()

try:
print 'entering read loop'
while 1 > 0:
data = ser.read(NUMCHARS)
if len(data) > 0:
print "Read " + data
finally:
print 'closing serial port'
ser.close
I've modified the reader.py quite a bit so that it tweets the received data, but the version above simply echoes the data to the terminal.

Run it like this:
# python reader.py
Send the Xbee data from another Xbee and watch it print.

Alright, I'm stopping and will pick up the story in my next entry. Look at this picture to see where we're going.


What do you think? Leave a comment.
No module named _md5 - Missing OpenSSL?

I'm working a Python project on an embedded Linux device. As usual, I've had my struggles but yesterday I ran into one a tough one. I was afraid that I was going to have to dump Python and go to another language, ruining a week+ of effort.

I'm using OpenWrt kamikaze 8.09 and have been making excellent progress until I slammed into the wall when attempting to import md5. This spins off an odd trace that ends with "No module named _md5". It seems that in Python 2.5, the md5 module was deprecated for hashlib but something seems fishy.

I'm not the only dweeb with this problem. Mr Google has pages of people whining and tons of people talking about patches. Maybe they're not having the exact problem I did, but lots of problems and no one is reporting success.

Here's my exact issue:
# python
Python 2.5.4 (r254:67916, Feb 2 2009, 22:32:58)
[GCC 3.4.6 (OpenWrt-2.0)] on linux2
Type "help", "copyright", "credits" or "license" for more information.

>>> import md5
Traceback (most recent call last):
File "", line 1, in
File "/opt/usr/lib/python2.5/md5.py", line 6, in
from hashlib import md5
File "/opt/usr/lib/python2.5/hashlib.py", line 133, in
md5 = __get_builtin_constructor('md5')
File "/opt/usr/lib/python2.5/hashlib.py", line 60, in __get_builtin_constructor
import _md5
ImportError: No module named _md5
Using the various tips in the Google searches, I mucked with my LD_LIBRARY_PATH and considered rebuilding Python. Finally, I actually started looking at the source referenced in the trace. Let's see what's there.

/opt/usr/lib/python2.5/md5.py, line 6
0 # $Id: md5.py 39316 2005-08-21 18:45:59Z greg $
1 #
2 # Copyright (C) 2005 Gregory P. Smith (greg@electricrain.com)
3 # Licensed to PSF under a Contributor Agreement.
4
5 from hashlib import md5
6 new = md5
A simple import and new. Nothing exciting there. Next.

/opt/usr/lib/python2.5/hashlib.py, line 133
131 # lookup the C function to use directly for the named constructors
132 md5 = __get_builtin_constructor('md5')
133 sha1 = __get_builtin_constructor('sha1')
134 sha224 = __get_builtin_constructor('sha224')
Ok, we're calling a built-in contructor. I'm a complete Python newb. WTFO? Next.

/opt/usr/lib/python2.5/hashlib.py, line 60
54 def __get_builtin_constructor(name):
55 if name in ('SHA1', 'sha1'):
56 import _sha
57 return _sha.new
58 elif name in ('MD5', 'md5'):
59 import _md5
60 return _md5.new
Alright, here's where the built-in constructor is defined and sure enough, it imports _md5. What sleuthing, I'm amazing. We know that the whole frickin problem is that module _md5 can't be found, this tangent really helped.

Scratch head, ear, and other parts. Let's look at that code again. Why are we calling that built-in constructor? Actually, I have no clue. But I did notice line 126 that's conveniently located above our error at line 133.

126 except ImportError:
127 # We don't have the _hashlib OpenSSL module?
128 # use the built in legacy interfaces via a wrapper function
129 new = __py_new
130
131 # lookup the C function to use directly for the named constructors
132 md5 = __get_builtin_constructor('md5')

An ImportError exception. Yup, that's what we have. But a comment that mentions a missing OpenSSL module. Woo Hoo, eureka!

Frantically do this:
# opkg update
# opkg install openssl-util
And like magic, no more _md5 errors. For me, it was a simple missing dependency on OpenSSL. I hope your error is this easy to correct.

FYI, the top line of my opkg.conf file is:
BTW, opkg is a newer version of ipkg. Either is simply "the package manager on the system".

What do you think? Did this help you? Leave a comment.