28 March 2009

XBee Adapter Kit PDQ

Just got done building an XBee Adapter and tested it in 34 minutes. That's right, 2040 seconds. Or 0.566666667 hours. Either way, it's PDQ.

I'm a soldering novice. I've been burning my finger tips for some years now but in limited batches so I'm in no way claiming any skill. (Actually, I'm claiming a lack of skill) And I wasn't speeding, I was in no rush to build this thing.

I opened the mail and snapped that there picture over there. Plugged in my soldering iron and started to look through the adapter pieces as it warmed up.

I built one of these last year so I knew the routine. They're so dirt simple, I didn't even have to look over adafruit's instructions this time. I just glanced at my other adapter to see which resistor was which. Everything else is a no-brainer to fit onto the board.

I did a few things different this time though. Since I don't have a PCB vice, I'm stuck with having the board laying flat on my bench. So I soldered in the 74125 buffer first, the female header sockets next, all the other pieces, and the male header pins last. Your mileage may vary, it was just simpler for me in that order.

So if I already have one of these (and a XBee Shield and a XBee Explorer), what the heck am I doing building another?

Now that I have a workable tweet-a-w/e, I need more XBees "whatevers".

I'm planning to have temperature sensor to tweet swimming pool data. So I need another XBee and an XBee Adapter.

I'm planning to use Sparkfun's Nike+ receiver in a Serial Adapter connected to an Arduino and start tweeting stalker data. So I need another XBee and an XBee Adapter.

I'm planning to hook up various ADC things to an Xbee and start tweeting real data. So I need another XBee and an XBee Adapter.

Get the point? I need more XBees and XBee adapter kits. Unfortunately the boss doesn't understand, so I will need to get these one or two at a time.

I finished soldering, slapped in an XBee and ran a test script that tweeted a tid bit to twitter. I knew I was making good progress but only noticed how fast after I snapped a second picture, and saw the timestamp. 34 minutes. I can't even make minute rice in 34 minutes.

22 March 2009

tweet-a-whatever (tweet-a-w/e) foundation

My explanation of the tweet-a-w/e ran pretty long in my last post. I took an Asus wl-520gu wireless router, installed OpenWrt, Python, and an Xbee to build the foundation of a tweet-a-whatever (tweet-a-w/e). My 13 year-old texting obsessed daughter choose that name BTW. The last post ran so long that I cut it off after I talked about how to read the serial port with pySerial.

This time, I'll explain a simple Python app that receives a string from a Xbee, decodes its header and then tweets the payload to a twitter account. I'm a complete Python newb so if you have suggestions on a better implementation, I'm all ears.

Here's basically what I've done. Heavily borrowed from mightyOhm and ladyada, this project receives data from Xbees in "the field". Using a unique header, the client app determines the payload destination which can be a tweet or a web service.

Mr mightyOhm has written a great series on hacking the Asus wl-520gu wireless router to build an open source wireless streaming internet radio receiver. If you haven't read thru Jeff's work, stop right now and read it. Now.

Ladyada's award winning tweet-a-watt takes data from a kill-a-watt, sends it to Xbee embedded in a hacked wl-520gu and then tweets it for the world to see how green you are. I've copied the Xbee connection from her and the idea of using Python. She didn't post her Python source, so I've had to stumble thru this. I just read tonite, that the tweet-a-watt project will be a project in Make Magazine, volume 18. [update] ladyada did post her source, I just missed it. Check out her good stuff here.

My tweet-a-w/e's spin is that any data generating thing (a "whatever") can be hooked to an Xbee in the field. Either directly to the Xbee or via an Arduino. The Xbee transmits to a receiving Xbee that has been wired into the serial port of a hacked Asus wl-520gu. The Python app running on the router reads the data and based on a unique header code, the payload is either tweeted or sent to a web service.

So I ended last time by showing a small snippet of Python that read the incoming data and printed it. Now let's modify that snip so it reads the first few characters and makes a decision of what to do. This first revision is pretty hackish and we'll improve on it as "whatevers" are added in the field. My opinion is get it working, then optimize.

Last time we installed Python but I didn't tell about the python-twitter wrapper from DeWitt Clinton. Here's what I did:
  • Install simple JSON dependency
  • wget http://pypi.python.org/packages/source/s/simplejson/simplejson-2.0.9.tar.gz
  • gunzip simplejson-2.0.9.tar.gz
  • tar xvf simplejson-2.0.9.tar
  • python setup.py install
And crash. Some weird error about "No module named _md5". WTFO?

Mr Google has no clue about this error. Plenty of problems, but I couldn't find anything. I mucked with my LD_LIBRARY_PATH and considered rebuilding Python. Finally, I actually started looking at the source referenced in the trace. Here's what I found. Install OpenSSL and problems are solved. I wrote about my fun here.
# opkg update
# opkg install openssl-util
And finally install python-twitter:
  • wget http://python-twitter.googlecode.com/files/python-twitter-0.5.tar.gz
  • gunzip python-twitter-0.5.tar.gz
  • tar xvf python-twitter-0.5.tar
  • python setup.py install
Woo hoo. We're ready to tweet.

I'm currently planning 4 whatevers that will be talking to the router:
Each whatever will be uniquely ID'd so the incoming data can be routed to a twitter acount or any other web resource. Because my originality lacks, I started with "[0]" for the test Xbee on my laptop, "[1]" for the temperature sensor, "[2]" for the Nike+, and "ox7e" for the Xbee.

I created an array to hold the whatever name, the unique header, the action to perform, and username/password:
# tweet-a-w/e stuff array
#   "whatever", header string, action, user, password
#
WE_ARRAY = [
['WE_TEST', '[0]', _tweet_it, 'username', 'password'],
['WE_TEMPERATURE', '[1]', _web_it, 'username2', 'password'],
['WE_NIKEPLUS', '[2]', _stalk_it, 'username3', 'password'],
['WE_XBEE', '0x7e', _tweet_it, 'username4', 'password']
]
The action array elements are functions to perform the tweet or web action. Here's what I defined:
#
# define functions to do something with received data
#

# tweet data
#
def _tweet_it(data, twuser, twpass):
# login to twitter
print 'tweet w/' + twuser
api = twitter.Api(username=twuser, password=twpass)
api.PostUpdate(data)

# web service data
#
def _web_it(data, twuser, twpass):
# tbd
print 'wrote to web service w/' + twuser

# stalk the data
#
def _stalk_it(data, twuser, twpass):
# tbd
print 'watch it w/' + twuser
Ok, now let's read the data and determine what we got:
# open up the serial port on router
#
print 'opening serial port ' + SERIALPORT
ser = serial.Serial(SERIALPORT, BAUDRATE, timeout=TIMEOUT)
ser.open()

# read data
#
try:
print 'entering read loop'

# loop forever
while 1:

# read it from serial port
data = ser.read(NUMCHARS)
if len(data) > 0:
print 'Read: ' + data

# loop thru our whatever array and see if we recognize the header
for i in range(0, len(WE_ARRAY)-1):
if data.startswith(WE_ARRAY[i][1]):
print WE_ARRAY[i][0] + " action " + WE_ARRAY[i][2].__name__
WE_ARRAY[i][2](data, WE_ARRAY[i][3], WE_ARRAY[i][4])
break

finally:
print 'closing serial port'
ser.close
The only tricky thing in that code is the action call. Once we have a header match, the 2nd array element is one of the action functions that we defined. Simply call it and pass the data, username/password as arguments.

My Python client file is here.

Get your file on the router and start it:
root@OpenWrt:/opt/project# python XbeeReader.py
And send it something. For me, a quick test is to use another Xbee in the SparkFun Xbee Explorer. When I plug this in to my laptop, it shows up as /dev/ttyUSB0 so to write a quick string is as simple as:
d@hopper:~/projects/wl-520gu$ echo "[0] Testing " + `date` > /dev/ttyUSB0
And on the router telnet window, I see:
opening serial port /dev/tts/0
entering read loop
Read: [0] Testing + Thu Mar 26 23:30:47 EDT 2009
WE_TEST action _tweet_it
tweet w/skibicki
I'm using a test twitter account and viola, the string "[0] Testing" shows up like magic.

How are the Xbees configured? Real easy. I put ZNET 2.5 Router / End Device AT firmware version 1244 on both. I use Linux so using X-CTU was a little tricky until I figured out how to use it with Wine. I wrote about it here.

The Xbee in the router is named PINK. Last year, I built the NKC Xbee Shield Kit and goofed something up. When I installed the Xbee, it got really hot and the white Xbee label turned pink. It still works but is discolored. Here's the X-CTU file for PINK.

The Xbee connected to my laptop via the Xbee Explorer is named WHITE. Because it's not discolored. The config is EXACTLY same as PINK except for the name and destination. After loading the ZNET 2.5 Router / End Device AT firmware, I went to the X-CTU Terminal tab and typed:
+++
ATNI WHITE
ATDN PINK
ATWR
Here's the X-CTU file for WHITE.

Plans for next time. Clean up the client so only the data is written to twitter and not the unique header. Then hook up the DS18B20 temperature sensor and start tweeting real data.

What do you think? Leave a comment.

21 March 2009

tweet-a-w/e using Asus wl-520gu and Xbee

Update: Newegg no longer stocks the Asus WL-520GU router but this is still a cool project. You can find these routers for $10-20 (or more) on eBay. Also someone sent me a comment that the Linksys WRT54G routers have serial ports that could be used in a similar manner. I haven't tried this yet but if a cheap Linksys router comes my way, I'll try and attempt to blog about it.
---------------------------------------------------------------------------------------------
A few of the geeks that I stalk follow on twitter have done some interesting things with the Asus wl-520gu wireless router. Jeff Keyzer of mightyOhm has a real nice series on using the router where he builds an open source wireless streaming internet radio receiver. He walks you step-by-step on why he chose the wl-520gu, how to load OpenWrt, adding a serial port header, and even interfacing it to an Atmel ATmega168 AVR microcontroller to drive an LCD. Very nice, thanks Jeff.

Mr mightyOhm is also the admin of the Asus Wireless Router Hacks Flickr Pool. Check out a few of the cool things he and others have done with the wl-520gu.

Not to be out done, LadyAda hacked her 520gu and ported her tweet-a-watt xBee code in a 5 hour hack fest. That's her router picture over on the right. Click it and see a brief description of her efforts. She mentions this project on twitter and on flicker but I haven't seen it on her blog. I've been messing with Xbees lately and ladyada's hack is just what i need.

I've been thinking about a tweet-a-temperature project that would monitor my pool temperature and tweet it every so often during the summer months. While I'm toiling away in the office, I could get SMS spam telling how great life is outside work.

Or maybe a tweet-a-lert that let's me know when my super-sekret door has been opened. Or a tweet-a-stalk when a victim with Nike+ shoes runs by a sensor.

Let's lay down the foundation for a tweet-a-whatever (tweet-a-w/e) project by hooking an Xbee to the router and installing a Python client that tweets whatever is received.

Yes, this seems to be very similar to ladyada's tweet-a-watt port. I'm shamelessly copying the hard work of mightyOhm and adafruit to set this up. What's my value-add? I'll ramble a lot and tell you about all my dead-ends.


We'll take a wl-520gu router, install openWrt firmware and configure it as a wireless client to my existing house wireless network. Using the 520gu's serial port, I'll hook up an Xbee in an Adafruit adapter. Next, install Python on an automount USB drive and write a client that reads incoming Xbee data and does the tweet.

So I ordered a wl-520gu from newegg and eventually pretty much followed mightyOhm's instruction for installing header pins on the serial port and installing OpenWrt.

If you've read any of my other ramblings on this blog, you know already that I'm not very original and sometimes not very smart. But I'm decent at stealing reusing other people's work and twisting it to fit my needs.

Let's first talk about the stupid things I did so you can avoid the mistakes in life that I have made.
  • Both mightyOhm and ladyada used OpenWrt by first flashing dd-wrt and then OpenWrt. Me? I choose to use tomato firmware instead because I wanted built-in USB support and the description of its feature sounded great. And because I wanted to waste 3 nights trying to configure it in wireless client mode. I'm not saying tomato is bad, I'm just saying that I struggled big time and I couldn't find many online tips. I finally said "uncle" and followed the mightyOhm's way and installed openWrt. And had it working in under a half-hour.
  • Installing a four-pin header isn't a hard thing. All I had to do was remove 4 blobs of solder and then solder in a header. So ... Why did I somehow brick my router? I was super duper careful removing the blobs (without a de-solder-er iron or a bulb) and then was careful soldering in the pins. I only applied heat for a max of 5 seconds and let it cool for about 5-10 seconds before re-attempting. Yet I did it. After I finished the header, the darn thing wouldn't boot. Nothing, dead to the world. No reset, no LED action, nada. I cussed for a day or two and then ordered a new one from newegg. Before I de-blobbed the new one, I ran down to Rat Shack and bought a desoldering bulb. 20 minutes later, I had a working router - with header pins. Lesson? If at first you don't succeed, spend more money.
  • With the default Asus firmware still installed, I found that logging in via telnet, the user/password was root/admin. Via the browser at 192.168.1.1:80, the user/password was admin/admin. Kinda odd, but maybe this tip will save you some hair.
Okay, so where are we in this story? Oh yeah, the start. Buy a wl-520gu router and boot it up fresh from the box. Don't muck with anything yet. Confirm that it starts and you can log in via a wired ethernet cable on a LAN port. The default address, username, password are on the bottom of the router (192.168.1.1, admin, admin).

On the 1st router that I bricked, I installed new firmware first, then tried to install the headers. On my working router, I did headers first, then firmware. I don't think it really matters what order you do this. But I ruined a $59 router, so you trusting me?

So do your own thing and follow mightyOhm's excellent instructions. Get headers on the serial port, install openWrt, and meet me back here in a few.

Back already? Good, you should have a router with OpenWrt that acts like a wireless client on your network. You should be able to wirelessly connect via telnet as well as via the serial port.

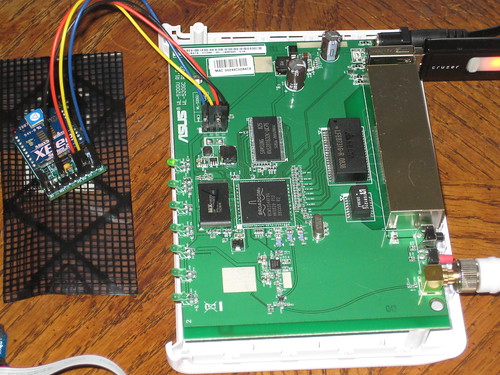
Yeah, I know the picture over there is kinda blurry but it's the best camera I have (donations accepted). If the picture was clear, you would see that I'm using a USB TTL-232 cable to talk to the router from a USB port to the router's shiny new headers. mightyOhm's picture on this page was very helpful for the pin-outs.

As is, the OpenWrt's filesystem is pretty cramped. There's not much space available to install extras such as Python. I had an extra Sandisk Cruzer laying around so I setup the router to automount the USB stick on /opt.

From either the serial line or a wireless telnet (my preference),
Then using hints from the openWrt wiki, I executed these commands:
  • # opkg update
  • # opkg install kmod-usb-core
  • # opkg install kmod-usb-ohci
  • # opkg install kmod-usb-storage
  • # opkg install kmod-fs-vfat
  • # opkg install kmod-fs-ext3
I installed both vfat and ext3 because my USB stick was currently fat but I wanted to reformat it to ext3. That should be pretty simple to do but as with most things, it was a hassle. I finally found how to do it and did this (click the link).

I want to install Python libraries and other extras on the USB drive so we'll need this auto-mounted at boot time. I couldn't locate clear instructions on this but here's what worked for me. Using tips from this place, I did:
  • Create a mount point
  • # mkdir /opt
  • Create an /etc/rc.d/S11mount file with macsat.com contents from this page.
  • NOTE: macsat's page references this as /etc/init.d/S11mount. For my version to work, I did not put it in init.d but instead put it in rc.d
  • # vi /etc/rc.d/S11mount
  • Paste in macsat's example S11mount content. My file version can be found here.
  • change the MOUNT_DEVICE0 statement to match your device. My USB stick was exactly the same as his example.
We're really making progress now. Next, we want to setup opkg so we can install large packages such as Python to the USB. Again, I'm using tidbit's from macsat.com excellent pages. Here's the good stuff.
  • Edit opkg config file to create an alternative destination for packages
  • # vi /etc/opkg.conf
  • Add this line:
  • dest opt /opt
  • My copy of the opkg.conf file is here.
Now some housekeeping. Since we want to install libraries and stuff on the USB stick, we'll need to continue following macsat's advice and update PATH and LD_LIBRARY_PATH in your /etc/profile. I set mine to:
  • export PATH=/bin:/sbin:/usr/bin:/usr/sbin:/opt/bin:/opt/sbin:/opt/usr/bin:/opt/usr/sbin
  • export LD_LIBRARY_PATH=/lib:/usr/lib:/opt/usr/lib:/opt/lib
If you'll be installing services on /opt that you want to start at system boot time, be sure to check out macsat's script here. I'll be using this after I complete the client app. For now, I'm just manually starting.

At this point, we have a flashed wl-520gu router with OpenWrt, headers soldered to serial port, and configured to mount a USB stick to opt at bootup. Let's keep mushing on.

The line that we added to the top of our opkg.conf file
sets us up to install from the kamikaze 8.09 packages which contain the Python 2.5 that I seek. Do this to install Python on the opt mount:
  • # opkg update
  • # opkg -d opt install python
Assuming that you haven't fallen asleep and you've setup your route similar to mine, after a few minutes, Python and all dependencies will be safely setup on /opt. Give it a try:
  • # python -V
And you should see the proof:
Python 2.5.4
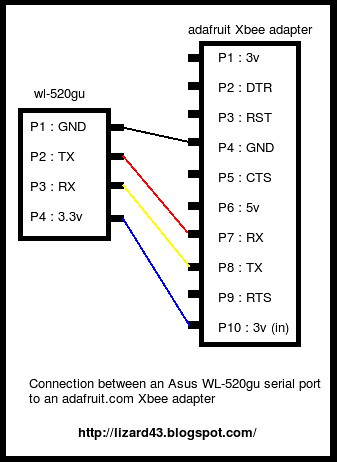
Using the AdaFruit Xbee Adapter that I blogged about last year, the next step is to simply hook it up to the 4-pin serial headers. This is the easiest step of all. 4 wires, hook 'em up.
  • wl-520gu GND -> Xbee GND
  • wl-520gu 3V -> Xbee 3V
  • wl-520gu TX -> Xbee RX
  • wl-520gu RX -> Xbee TX
Since OpenWrt uses the serial port /dev/tts for console login, we need to modify the /etc/inittab file. All this takes is to comment out the tts line:

#tts/0::askfirst:/bin/ash --login

I'm using Python for the client app, so we need to install the pySerial module from SourceForge. Create a temp folder on /opt, CD to it, download pySerial, unzip, untar, and install
All we need now is a app that reads the serial port and tweets. This blog getting pretty long so I'll just explain the serial port read and talk about the tweet part next time.

reader.py

#!/usr/bin/env python
import serial, time

SERIALPORT = "/dev/tts/0"     # the com/serial port the XBee is connected to
BAUDRATE = 9600               # the baud rate we talk to the xbee
TIMEOUT = 0.5                 # the timeout to wait for buffer fill
NUMCHARS = 140                # the number of characters to attempt to read at once

# open up the FTDI serial port to get data transmitted to xbee
print 'opening serial port ' + SERIALPORT
ser = serial.Serial(SERIALPORT, BAUDRATE, timeout=TIMEOUT)
ser.open()

try:
print 'entering read loop'
while 1 > 0:
data = ser.read(NUMCHARS)
if len(data) > 0:
print "Read " + data
finally:
print 'closing serial port'
ser.close
I've modified the reader.py quite a bit so that it tweets the received data, but the version above simply echoes the data to the terminal.

Run it like this:
# python reader.py
Send the Xbee data from another Xbee and watch it print.

Alright, I'm stopping and will pick up the story in my next entry. Look at this picture to see where we're going.


What do you think? Leave a comment.

Format USB Flash Drive with ext3

Using Ubuntu 8.04 Hardy Heron, I figured it would be easy to format a thumb drive to ext3. Seems for me that nutin is easy. My plans for the USB stick is to use it with an embedded Linux box that could expectantly shutdown.

Wikipedia says this about ext3:
The ext3 or third extended filesystem is a journaled file system that is commonly used by the Linux kernel. It is the default file system for many popular Linux distributions.
...
Its main advantage over ext2 is journaling which improves reliability and eliminates the need to check the file system after an unclean shutdown.
After a few struggles with attempting to use the Partition Editior, I ended up reformatting the stick by following these instructions:
  • mount your USB stick. With Ubuntu, most automount so this is as simple as sticking it in
  • do a "$ df" and determine your drive's partition name. Mine is /dev/sdb1
  • unmount the drive
  • Be very careful and double-dog sure that you have the right partition name.
  • Use your USB's partition name in-place of my example/dev/sdb1
  • Don't ruin your hard drive by using the wrong partition. Be careful !
  • $ sudo mkfs.ext3 /dev/sdb1
  • Give your drive a name
  • $ sudo e2label /dev/sdb1 usb-mydrive

What do you think? Leave a comment.

No module named _md5 - Missing OpenSSL?

I'm working a Python project on an embedded Linux device. As usual, I've had my struggles but yesterday I ran into one a tough one. I was afraid that I was going to have to dump Python and go to another language, ruining a week+ of effort.

I'm using OpenWrt kamikaze 8.09 and have been making excellent progress until I slammed into the wall when attempting to import md5. This spins off an odd trace that ends with "No module named _md5". It seems that in Python 2.5, the md5 module was deprecated for hashlib but something seems fishy.

I'm not the only dweeb with this problem. Mr Google has pages of people whining and tons of people talking about patches. Maybe they're not having the exact problem I did, but lots of problems and no one is reporting success.

Here's my exact issue:
# python
Python 2.5.4 (r254:67916, Feb 2 2009, 22:32:58)
[GCC 3.4.6 (OpenWrt-2.0)] on linux2
Type "help", "copyright", "credits" or "license" for more information.

>>> import md5
Traceback (most recent call last):
File "", line 1, in
File "/opt/usr/lib/python2.5/md5.py", line 6, in
from hashlib import md5
File "/opt/usr/lib/python2.5/hashlib.py", line 133, in
md5 = __get_builtin_constructor('md5')
File "/opt/usr/lib/python2.5/hashlib.py", line 60, in __get_builtin_constructor
import _md5
ImportError: No module named _md5
Using the various tips in the Google searches, I mucked with my LD_LIBRARY_PATH and considered rebuilding Python. Finally, I actually started looking at the source referenced in the trace. Let's see what's there.

/opt/usr/lib/python2.5/md5.py, line 6
0 # $Id: md5.py 39316 2005-08-21 18:45:59Z greg $
1 #
2 # Copyright (C) 2005 Gregory P. Smith (greg@electricrain.com)
3 # Licensed to PSF under a Contributor Agreement.
4
5 from hashlib import md5
6 new = md5
A simple import and new. Nothing exciting there. Next.

/opt/usr/lib/python2.5/hashlib.py, line 133
131 # lookup the C function to use directly for the named constructors
132 md5 = __get_builtin_constructor('md5')
133 sha1 = __get_builtin_constructor('sha1')
134 sha224 = __get_builtin_constructor('sha224')
Ok, we're calling a built-in contructor. I'm a complete Python newb. WTFO? Next.

/opt/usr/lib/python2.5/hashlib.py, line 60
54 def __get_builtin_constructor(name):
55 if name in ('SHA1', 'sha1'):
56 import _sha
57 return _sha.new
58 elif name in ('MD5', 'md5'):
59 import _md5
60 return _md5.new
Alright, here's where the built-in constructor is defined and sure enough, it imports _md5. What sleuthing, I'm amazing. We know that the whole frickin problem is that module _md5 can't be found, this tangent really helped.

Scratch head, ear, and other parts. Let's look at that code again. Why are we calling that built-in constructor? Actually, I have no clue. But I did notice line 126 that's conveniently located above our error at line 133.

126 except ImportError:
127 # We don't have the _hashlib OpenSSL module?
128 # use the built in legacy interfaces via a wrapper function
129 new = __py_new
130
131 # lookup the C function to use directly for the named constructors
132 md5 = __get_builtin_constructor('md5')

An ImportError exception. Yup, that's what we have. But a comment that mentions a missing OpenSSL module. Woo Hoo, eureka!

Frantically do this:
# opkg update
# opkg install openssl-util
And like magic, no more _md5 errors. For me, it was a simple missing dependency on OpenSSL. I hope your error is this easy to correct.

FYI, the top line of my opkg.conf file is:
BTW, opkg is a newer version of ipkg. Either is simply "the package manager on the system".

What do you think? Did this help you? Leave a comment.

14 February 2009

2009 Running Goal - 12 Races

Years back, I was a decent runner. Then we had kids and life got busy. I also got old. Last year on vacation in Orlando, the whole family ran the Winter Park Watermelon 5K which re-started the racing bug again.

Especially with my wife. Years back, she wanted nothing to do with running. Now she's very competitive and pushes me to train with her.


My Stats:
My goal this year is to run 12 races. I'd love to be able to run in the 20's again some day but it's very unlikely. But if I can train enough and my legs stay healthy, I'm hoping to run a 5k in 21+change this year. 21:59 would meet that wish.
[status] 8 races run so far - 4 to more to meet goal
Here's a few handfuls of races that I'm going to attempt to run this year. With the expectation that due to kid's baseball, softball, track, cross-country, and other life events, I'll be able to do about half.

Feb 08,2009 1pm Sun
Run It Walk It For Chris Brown - 5K Prediction Run/Walk
IPFW Hilliard Gates Sports Center, Fort Wayne, IN
[results] 22:53 or about 7:21/mile. Decent day, about 40°. I finished 49/256 overall.
Feb 14,2009 2pm Sat
Fanny Freezer 5K (FWTC Points Race) - 5K
Shoaff Park, Fort Wayne, IN
[results] 23:00 or about 7:22/mile. Kinda winterly looking day, around 33°. It snowed the night before but the course was clear. I run Shoaff Park almost every week so I should have done better but this is a hard course for me. I was breathing at the end and I finished strong, so I'm happy. A few more Shoaff races are planned - I will do better. I was 71/230 overall, 10th in my age group. But wait. This just in. Chris of Dangerous Logic says that there was a bandit or two loose on the track. My watch time was 23:04 but the official stats said 23:00. I guess the bad guy(s) went thru the shoot instead of staying to the side and skewed the times. I don't care, I'm not giving back the 4 seconds. Damn bandits.
Feb 28,2009 10am Sat
Think Spring - 5K Run & 1 Mile Run
Ligonier Elementary, Ligonier, IN
[results] Wow, it was cold. About 19° at race time. Instead of "Think Spring" it should've been called "Spring : Wishful Thinking". It was brutal. This was a slow race for me. 23:54 or about 7:41mile. I was 18/46 overall, 2nd in my age group. It was a straight out and back course. At the halfway, I was running 10:48 and thought I'd finish with a 22:30 or so. But then the non-stop-in-the-face-to-the-bone wind drained everything from me. I was dying. I let two people pass me in the last half mile. I re-passed one of those in the stretch but couldn't catch the other - a 13yo girl. Oh but the good news. On the way out, I saw a cell phone on the side of the road. Since I was motoring, I didn't stop to pick it up. On the way back, since I had slowed to a near crawl, I figured that I might as well snag the phone but couldn't find it. My wife says that if I would've ran the back half instead of looking for the phone, I would've had a better time. Maybe. After the race, we drove up the stretch and sure enough, there it was. A damaged BlackBerry 8100 with sim card and 2G SD. This had been out in the weather for a while. Missing back cover, missing battery, missing trackball, rusted inside, and the screen has water inside. What a prize.
Mar 14,2009 9am Sat
Vasque DINO Trail Run -Indy - 5k
Eagle Creek Park, Indianapolis, IN
[results] This was by far the toughest, most challenging course I've ever run. Tree roots, logs, hills, stairs, kitchen sinks, you name it. Since I've been running about ~23 minutes for 5Ks lately, I predicted ~25 for this race. So when I crossed the finish at 23:35 or about 7:35/mile, I was surprised. Sore, tired, near-death, but surprised. I was 4th in my age group, 50/195 overall. Very fun, I hope to run in the next 6 DINO trail runs. BTW, my wife finished 2nd in her age group and won a nice plaque.
Mar 21,2009 11am Sat
29th Annual Nutri Challenge 5M Run
The Chapel, Fort Wayne, IN
[results] Nope, couldn't do it. I had a cough all week and just couldn't see myself going for a 5M race. I'm still hoping for next week's trail run in Anderson
Mar 28,2009 9am Sat
Vasque DINO Trail Run - Anderson - 5K
Mounds State Park, Anderson, IN
[results] I thought DINO trail run 1 was hard. This was very tough. Monster hills and stairs. My finish times are suffering by running trail runs. These are fun but I'm dying! I haven't had to walked in a race in probably 10 years. Yet I walked twice today, both times mid-hill. My time was 26:08 (or about 8:24/mile), by far my slowest 5k in recent memory - maybe all-time. I was 36/152, 5th in my age group. Yes, I'm running the next trail run. I have to. BTW, my wife finished 1st in her age group and my daughter was 4th in her's.
Apr 11,2009 9am Sat
Vasque DINO Trail Run -Avon - 5k
Washington Township Park, Avon, IN
[results] What a mess. We left Ft Wayne at 6am to make a 9:10 start time. We arrived at 8:58, 12 minutes before race time. Google maps led us to the wrong side of town and we were lost. No one at gas stations had a clue. A police officer on the side of the road had never heard of Washington Township Park. I was panicing and started driving towards home. Luckily a guy stopped at a red light with us knew the place and we made it just in time. Not exactly how I like to race, no time to stretch and relax. But we made it. Kinda wish we hadn't. My time sucked again. 26:44, 62/167, 5th in age group. The course was insane. The hills didn't seem as bad as last race but the terrain was really really challenging. Super fun. I wish I could run it again next week cause I'm sure that now that I know what it's like, I could do better. My wife came in 1st in her age group again (2nd, 1st, 1st for last 3 DINO runs!). My daughter came in 5th in her group. We'll get better. 4 more DINO trail runs to go.
Apr 18,2009 9 a.m
Shoe-Sucker Seven (FWTC Points Race) - 7.3 miles
Kilsoquah Campgrounds, Roush Lake (Huntington Reservoir), Huntington, IN
[results] Not going race it. Besides being a 7 mile race thru mud that doesn't sound really exciting, I've signed up for a seminar at IPFW that day.
Apr 25,2009 9 am
IPFW 14th Annual Mastodon Stomp - 5k
IPFW Hilliard Gates Sports Center, Fort Wayne, IN
[results] I'm starting to run out of excuses for doing crappy at a race. It was a beautiful day, a balmy 60°. After months of running in 40s or less, it felt hot. And I bonked. A decent 1st mile of 7:18 and everything was fine. Then the wheels fell off somewhere in 3rd mile and a pack of old men (all in my age group) passed me. What's really bad about this is only 30 seconds separated me from the above 5 runners in my age group - All of who passed me while I was bonking.
I finished at 24:48, 90/356 overall, 9/18 in my age group. My times are going the wrong way after a decent start this year. My main problems: I'm old and I'm not training so I don't have endurance.
May 16,2009 10am Sat
Warbird Road Race 2009 (FWTC Points Race) - 5K
10515 Majic Port Lane, Fort Wayne, IN
[results] 24:49 or about 8:00/mile. 4/15 in age group, 38/485 overall. Decent run, started out a little slower than normal because it seems like I'm really bonking in the 3rd mile lately. My daughter stayed with me thru the first two miles and then started to slow in the 3rd. Since we were on a good pace for her, I was afraid she was going to really slow and ruin a good effort. So I stayed with her and encouraged her to keep it going. Result - she took first place in her age group! 24:51, a new PR by 20 seconds! And because the large crowd, we didn't cross the start until 20 seconds after the gun so if the chip timing really worked, her time would've have been close to 24:30. My wife placed 3rd in her age group 27:34. I'm so glad that they run, I can't wait until my son starts running races also.
May 30,2009 9am Sat
Vasque DINO Trail Run -Nashville - 5k
Brown County State Park, Nashville, IN
registered
Jun 13,2009 8am Sat
Tinkham's 5K Trail Run
Camp Whitley, Columbia City, IN

Jun 21,2009 8:00 AM
Run 4 Trails - 5K Trail Run
Metea County Park - 8401 Union Chapel Rd. Fort Wayne, IN 46845, Fort Wayne, IN

Jul 4,2009 7:30AM
19th Annual July 4th Watermelon 5k
Winter Park, Florida

Jul 18,2009 7:30am Sat
Dr. Phil O'Shaughnessy 5K
Foster Park, Fort Wayne, IN

Jul 25,2009 8:30 AM
Bruin Alumni/Open - 5K
Shoaff Park, Fort Wayne, IN

Sep 05,2009 9am Sat
Vasque DINO Trail Run -Indy - 5k
Town Run Trail Park, Indianapolis, IN

Sep 07,2009 9am Mon
Blueberry Stomp - 5K
Centennial Park, Plymouth, IN

Sep 19,2009 9:15am Sat
Hope Center 5K
Shoaff Park, Fort Wayne, IN

Sep 26,2009 7:30am Sat
Fort-4-Fitness 4 Mile Run
Freimann Square Downtown, Fort Wayne, IN

Oct 10,2009 9am Sat
Vasque DINO Trail Run -Indy 5k
SouthWestway Park, Indianapolis, IN

Oct 18,2009
2009 Great ANT Race - 5K
Fort Wayne, IN

Nov 14,2009 9am Sat
Vasque DINO Trail Run - Fort Harrison 5k
Fort Harrison State Park, Indianapolis, IN

Dec 12,2009 10:30am Sat
Reindeer Romp 5K
Botanical Conservatory downtown - Calhoun at Jefferson, Fort Wayne, IN

31 January 2009

Grid Computing with GridGain

Similar to the famous "one word - Plastics" scene in "The Graduate", a senior engineer took me aside on the weekend of the Columbia explosion and said "Grid Computing". We were working long hours for a proposal that was insane at best. At the time, I had heard of SETI@home but never really had spent any time on the subject. Tim was pretty excited about the topic. He had just read an article in some Hype-of-the-Day rag and was sure that Grid Computing was going to be the solution we needed for our proposal.

We ended up winning the job which is a really big deal. I think we're up to around $400M now over the past few years. The app is a distributed system (not a web app) but doesn't use Grid Computing and never will. It's tied into the customer's crazy network dreams and their infrastructure framework that locks our applications to theirs. Actually, it's brilliant in a business way. Our apps can't ever be used for anything other than for their original purposes.

For the past few months, I've been following the blog @Gridify Cloud Computing via Google Reader. Honestly I don't know why. I must have stumbled on an interesting entry one day and added then to the reader for future ref. This weekend, I was scanning the blogs and I saw a GridGain blog that started with:
When executing tasks and jobs on the grid you may be faced with the question: "How do I make sure that tasks from other users are not executed on nodes started by me?"
We're asking ourselves the same question on my project so the entry piqued my interest. The GridGain solution can't help me in anyway but it got me to their website where I started to poke around. I watched a few short videos on GridGain installation and creating an app in 15 minutes. Ok, I'm interested, let's do this.

Installation is pretty easy, just go to the downloads page and grab the installer for your OS. I'm using linux, so I got the GUI installer gridgain-unix-2.1.0.sh and ran it like this:
sh ./gridgain-unix-2.1.0.sh
Pretty easy. I decided to install under my projects folder so next I setup environment variables for GRIDGAIN_HOME in ~/.bashrc like this:
export GRIDGAIN_HOME=~/projects/gridgain-2.1.0
I haven't used Java much lately and was happy to see that GridGain had Groovy examples. I attempted to run the examples and immediately ran into difficulties. First was my fault. I un-installed Groovy a bit ago and needed to get the latest distribution. I did:
sudo apt-get install groovy
And presto, groovy was re-installed. A quick sanity check verified that it was installed:
groovy -v
This reveals that groovy 1.5.2 was installed. Hmmm, I swore that a newer version was out but 1.5.2 should be good for the GridGain demos, right? Right.

I stepped up to the first example compileGridify.sh. It immediately complained that GROOVY_HOME wasn't set. Back to ~/.bashrc and I added this line:
export GROOVY_HOME=/usr/share/groovy
Then the script started to complain that class Gridify couldn't be found. This is GridGain's own example, the thing should run almost out-of-the-box. Durn it! A little more digging reveals the the compile example referenced gridgain.jar in the classpath when the actual jar is called gridgain-2.1.0.jar. I started to edit the file and realized that there were probably other scripts in the GridGain install that may have the same error. Rather than go on an edit-fest, I simply created a soft link in GRIDGAIN_HOME like this:
ln -s gridgain-2.1.0.jar gridgain.jar
Yeah! it compiled. Now to the run script. The runGridify.sh complained that it couldn't find the groovy.lang.GroovyObject class. Kinda weird cause that's the momma groovy class. Sounds like another classpath issue. And it was. The run script references embeddable/groovy-all-1.5.7.jar. Problem is that not only did I have version 1.5.2, that version doesn't even include a groovy-all.jar. I wonder why? I then went to groovy home and looked around. Version 1.5.6 has a Debian package but the newest 1.5.7 doesn't. Sounds like 1.5.6 is the next to try. After installation, I looked at GROOVY_HOME and yes!! It has an embeddable folder and a groovy-all-1.5.6.jar. Now a quick edit to the runGridify.sh file and back in business.

The gridify example starts up a default configuration and prints out "Hello World" on a remote node. Nothing too exciting but impressive if you look at all that really is happening in the background.

The other example compileHelloWorld.sh and runHelloWorld.sh have the exact same issues with classpath jars. This example is similar to Gridify but prints "Hello" on one node and "World" on another. To do this, start another node in a terminal before running runHelloWorld.sh :
./gridgain.sh
There's many cool things that can be done with GridGain. One interesting thing is running JUnit tests after a build in a parallel manner. The GridGain guy claims that running their test on a single box takes about 3 hours. Gridifying the Ant task reduces that to about 20 minutes.

Take a look at the videos and other stuff on the website to get started. As well, DZone has a pile of hits. Search DZone for gridgain

I reported these version probs to the GridGain user forum. They made the fix and updated the wiki the next day. Nice.

http://www.gridgainsystems.com/wiki/display/GG15UG/Groovy+Configuration+And+Setup

24 January 2009

Seven-Segment Vacuum Fluorescent Display (VFD)

Do you ever go to surplus electronic stores just to wander the aisles? Years back, I used to go to Skycraft Electronics in Winter Park. It's still there. On pilgrimages back to the homeland, I occasionally will stop by but it's not the same. Back then I'd go alone or with a fellow geek and be able to spend hours digging around. Now days I have a wife and/or kids in tow that have zero patience and it's rush rush rush. It seems that the beach, Disney, or Universal is more important to them than junk heaven. They need priority adjustments.

My current area had a junkier place called Misener Electronics, formerly Pembleton Electronics, that has potential but they keep moving locations and they may be gone for good. Current rumour is that they moved from the Volleyball Courts to 500 Coombs Street. No one answers the phone and I drove by the empty looking building today. I think we've lost the only electronic junk store in town.

When Misener was open last year, I found a box of an interesting FIP (Fluorescent Indicator Panel or Vacuum Fluorescent Display (VFD)) for about 25¢ each. I grabbed a handful and added to my junk pile. These look pretty nice but what can I do with 'em? Any idea how to drive them? I started Googling the part number and few a limited number of hits. Part number NEC FIP6C15A at least reveals these specs but doesn't give any pinouts.


NEC Electronics FIP6C15A
Seven-Segment Vacuum Fluorescent Display - 7-Segment Numeric
Package Style (Basic)=SIP
Color=Blue-Green
Number of Digits=6
Character Height (mm)=15
Vsup Nom.(V) Supply Voltage=3.7
Iseg (A) Segment Forward Cur.=150m
Lv Typ.(fL) Luminance=700
Package=SIP

BTW, I also found a nice description of VFDs at http://hem.passagen.se/communication/vfd.html which is where I grabbed that image of the "Expoded" (sp) VFD. Seems that a common source of VFDs is old VCR displays.

Using the ATX PSU that I put in test mode, I applied +3.3VDC across the filaments (on this VFD, the two out side pins that I labeled as Element for some dumb reason), and then randomly picked a grid (which is one of the leads not below one of the yellow blocks on the back) and stuck +12VDC on it. Then applied +12VDC to various segments which are the pins below the yellow blocks.

The result was that many segments lit depending on the combination of the grid a segment(s) I had powered. Pretty cool. I called over to my son Will who then made it his life's work to light as many segments as possible. During his investigation, he shorted a segment to the filament and we got a nice spark show and the PSU shutdown. I was worried that we blew out the VFD but after a brief power cycle, the fun returned.

This was pretty cool but obvious that it would be tough to control this with an Arduino to make it a useful display. A Maxim's Application Note 1154 lists VFD Tube Manufacturers' Web Sites. In that appnote is a list of Maxim tube driver chips that would be great for interfacing to my VFD. The MAX6934 looks about right.

Of course after tiring with the NEC VFD, we then had to rip a more complex one out of an abandoned VCR in the garage. This one (no pictures) was odd. After hooking up the filaments to +3.3VDC, any other pin that we put +12VDC on caused stuff to light. On the NEC FIP6C15A VFD, the grid had to be powered separately, then segments were lit by putting power to pins. This VCR VFD seemed skip the grid power need. ?? Doesn't seem right but that's what it was doing.

20 January 2009

PC Power Supply for the Lab Bench

Seems like everyone has converted an old PC Power Supply for use in the lab. I've been using old wall warts for most of what I need so I haven't really paid much attention to the weekly instructable or hack that gives the step-by-steps. I admit, it sounds great. Plug in the supply and you have instant regulated +3.3VDC, +5VDC, +12VDC, -12VDC, -5VDC, and +5VSB. Yup, sounds great.

Wait. +5VSB, what's that? It's the 5 Volt Standby voltage. It's the voltage that remains running when the power supply suspends and is used to power the "wake on" devices such as network cards and modems used to bring the computers out of suspend mode. It's been around on PSUs for quite some time, I guess just haven't noticed it.

Since the wall warts are ok for me, why am I writing about a PSU? Because Spoofee told me about a dirt cheap one. Buy it, rebate, and it's almost free! I love almost free 'cause it's really cheap. Okay, I did the buy and rebate thing and now have a PSU sitting on the bench. I guess the instructables are needed.


But first a warning. All I'm doing here is simply putting the PSU into a test mode so I can vampire the juice from a connector. Although the volts are regulated, the current can zap the crap out of your circuit if you short something. Check out the instructable above to see how you can do this better. Read the comments to that instructable to see the many cons on using a PSU for your project. I'm lazy and just want quick power to run a VFD that I'll blog about soon. You, are not lazy and will do this better. If you do this to a PSU, be careful.

Here's a real decent pin-out that I found at Help With PCs. I especially like the color coding 'cause it helps my old eye find the right volt pin quickly.

The Ultra X-Connect PSU that I have has a ATX 2-pin, 6-pin Xeon, 4-pin Pentium 4, and five 4-pin Molex connectors.

A problem with ATX PSUs, they won't power up without the Main Power connector being hooked up. To power up an ATX or ATX-2 PSU for testing, short pin 14 (PS_ON) with one of the grounds.

I just stuck a wire in the 20-pin main power connector and shorted pin 14 (PS_ON) to pin 15 (GND). Just like that pic over on the right.

The PSU rumbled to a start and viola, free power. VFD, here I come.

05 January 2009

USB Bluetooth to Serial

I wrote about a crap Bluetooth dongle that I bought last year. I was terked about the big honkin' plastic case with a fake antenna. While looking at the pcb, I noticed that it was a Cambridge Silicon Radio (CSR) chip labeled BC212 015BD A21AA. At the time, I did a quick Google search on the part number and moved on after not seeing anything too interesting.

Tonight I read a post on the Arduino Forum about cheap Bluetooth that said most USB Bluetooth dongles were "just a USB Serial Com device for the Bluetooth software stack to talk to". What?!? No frickin' way. A USB dongle is a USB Slave device that requires a USB Master device to interfaces with it. Isn't that so?

Mr Dougl's (junior member) post started me thinking about that Bluetooth crap thing. There's no way that it's just a serial port device. I went back to that quick Google search and began reviewing the hits. This one seems interesting. A Bluetooth RS232 to Bluetooth Adapter. And it uses the same CSR BT chip as my crap. Hmmm. Could my chip have a simple serial interface? And if it does, can I interface this crap to the simple serial rx/tx interface of an Arduino?

A little more digging uncovered the CSR BlueCore DataBook that says the BC212 has both a USB and UART interface.

First thing I noticed here is the module uses CTS/RTS handshaking, which is currently a bit of a rough spot with Arduino. Another deal breaker may be the words above that say "requires external RS232 transceiver IC". I dunno. I'll look at this again soon and see if any progress can be made.

03 January 2009

Eat the Dogfood

I try to practice what I preach, eat my own dogfood so to speak. In my rambling "Help Yourself", I wrote that you should regularly do stuff to sharpen your geek-foo. It's already 3 days into a new year and I haven't yet chanted a resolution (why mess with perfection?) or set new personal goals. I'm over due.

Comic #498AnotherRandomDay.com

Ok, so here we go. This year, my goals are:
  • Learn a new language. This is do-able. I added Groovy last year. This year will be either Erlang or Python. Probably Python or more likely Jython. When learning a new language, it doesn't count unless you do something with it. So this goal includes learning and then coming up with a project to implement.
  • Fly my r/c airplane. I bought a Firebird Phantom plane and was ready to fly. My wife accidentally broke it before I got the chance. I will fix and fly it this year. Then I'll return to Chris Anderson's DIY UAV website and start dreaming again.
  • Attend seminars. This is tough because my town is lacking in the free stuff. I'm going to keep an eye out for anything interesting in Indianapolis or even Chicago or Detroit. Here a local one that I will attend in April "Managing Like a Prince: What Machiavelli Teaches Us".
  • Re-read Charles Petzold's Code: The Hidden Language of Computer Hardware and Software. I'm kinda cheating on this goal because I've already started this (but not until yesterday so I'm still counting it for this year). This is a great book that I read a few summers ago and ended up just skimming thru the later chapters. This time, I'm reading it all.
  • Do a 7 in Seven and blog each one. 7 in Seven is an audacious scheme by the ITP Resident Researchers to do seven creative projects in seven days. My projects will be code and hardware related involving a bot or something similar. Yeah, I'm already doing that stuff but this time I'll have a deadline for each one.
  • Volunteer. I will participate in a city trash cleanup or house painting or leaf raking or ... I'll keep my eye out for opportunities posted on bulletin boards and will help where I can. My time is limited with a non-stop job and a busy family but I can't use those as excuses. I'm also very fortunate with a decent income and my health. I need to help others more.
  • Lose 10 pounds. This is the 3rd year in a row with this goal. 3 years ago, I actually gained a few, 2 years ago I stayed the same, last year I lost 5 pounds. This year, I'm doing it. I run a lot. I just eat more than I should. Check out the great recipes I have bookmarked on Delicious. yum. None are low-fat or diet. This will be my toughest goal.
I have other things in mind but these are the ones I'm committing to. I regularly read a few books (mostly fiction) each week so adding "read more" isn't a goal, it's a fact. I'd really like to take a few college course this year but that's not practical because of my insane work schedule. I just can't commit to a semester long obligation.

I'd love to hear your geek goals. What will you be doing to Help Yourself?

GPS and Twitter

Early last year I created a twitter account. Not really sure why I did. I guess no one wants to be left behind in the micro blogging world. Other than announcing that I wrote another entry on this blog, I never did anything with twitter.

Later, I stumbled on JTwitter which is a small Java library to the Twitter API. It lets you set/get your Twitter status, manage your network of friends, message friends, etc. I goofed with it for a few minutes. Example usage:
// Make a Twitter object
Twitter twitter = new Twitter("my-name","my-password");
// Print Daniel Winterstein's status
System.out.println(twitter.getStatus("winterstein"));
// Set my status
twitter.updateStatus("Messing about in Java");
Interesting. But I have no app in mind for Twitter, so JTwitter was bookmarked on Delicious for later. Today I saw on Make a cool project where a washing machine sends a message to Twitter when it's done. Pretty neat but if I hacked into my wife's LG, I'd be dead meat.

Because of Arduinos and Xbees, I've been spending lots of time on ladyada's site either buying stuff at adafruit or trying to get smarter by lurking in the forums. Ladyada seems to be alright but she has weird hair. She's pretty quick on answering forum questions and builds decent stuff. I really like her Xbee Adapter Kit.

Chris Anderson is an editor for Wired magazine. He also has a website for DIY UAVs at http://diydrones.com. Last year, I spent lots of time at his site 'cause that's something else that I want to build some day. After I read that Washing Machine Twitter thing, I read a blurb about Chris' new business model for an open source robotics startup. He says:

I'm ok with that business model but the reason I'm spinning this long story is that Chris spilled those beans via Twitter. Oh, I didn't know he had a Twitter account. I wonder what else he writes about? He writes about life and stuff. I wonder who he follows on twitter? He's the editor for Wired mag, probably follows some interesting people, huh? Sure enough, Tim O'Reilly, Phillip Torrone (Make mag), Brad Stone (NY Times), Steven Levy (found Einstein's brain, wrote Hackers, etc), and others. And Ladyada.

Ladyada's twitter status hadn't been updated in quite awhile but it was filled with entries such as:
That looked interesting as I recognized the entries as GPS strings. The National Marine Electronics Association (NMEA) has developed a specification that defines a GPS interface for the various hardware devices. NMEA also has its own version of essential GPS pvt (position, velocity, time) data. It is called RMC, the Recommended Minimum. These strings are prefaced with $GPRMC. Read all about it here.

Adafruit has a Botanicalls Twitter kit that allows plants to ask for human help via a Twitter message like "water me please" and "you over watered me". But plants don't have GPS, so I'm guessing that ladayada was messing with her Arduino GPS Shield and was logging position updates to Twitter.

I wonder where that pvt data points to? Using JTwitter, I grabbed ladayada's last status:


// Make a Twitter object
Twitter twitter = new Twitter("twitter-username","twitter-password");
// Print the lady's status
System.out.println(twitter.getStatus("ladyada"));
As expected, out pops:

$GPRMC,045519.000,A,4042.5917,N,0 7400.5417,W,0.68,290.51,160808,,* 17


In that string, the latitude is 4042.5917N. The longitude is 7400.5417W. Where is the hell is that?

Another Google search led me to a an interesting article on Sun's website, Working with Bluetooth and GPS. I grabbed the source code and parsed ladayada's string:


gps.datatypes.Record record = new gps.datatypes.Record();
System.out.println("recordtype="+
gps.parser.Parser.parse(twitter.getStatus("ladyada").getText(), record));
System.out.println("recordlat="+record.lattitude);
System.out.println("recordlon="+record.longitude);


And out pops:

recordlat=40.70986
recordlon=-74.009026

Ok, that's more like it. Somewhere in the good 'ol USA, NorthEast area. Stuff it into Google maps and sure enough, ladyada was stomping around in New York City.


What can I do with this new knowledge? I still have no app in mind but I have a few more tools to think about. And stick 'em in the shed for later use. That old shed is getting pretty full of tools for later. I better start oiling 'em before they all get rusty.

The src that I ref'd above needed some tweaking to convert the lat/lon strings to decimal degrees. I found another spot for the same code but was slightly diff in the parsing for GPRMC: Simple J2ME NMEA parser. Neither Parser was just what I needed, so I combined the two into the method below. This code is owned by Dominik Schmidt, I just modified it some.

/**
* NMEA-0183 Parser. Parses data sent by GPS receiver. As data is being
* transfered via XML to server, parsing consists in most cases of separating
* fields.
*
* @author Dominik Schmidt
*
* Copyright (C) 2006 Media Informatics Group (http://www.mimuc.de),
* University of Munich, Contact person: Enrico Rukzio
* (Enrico.Rukzio@ifi.lmu.de)
**/
public static int parse(String s, Record record)
throws UnsupportedTypeException, ParseException {

// Tokenizer to separate tokens
Tokenizer tokenizer = new Tokenizer(s);

// Type of record
int type;

try {
String token = tokenizer.next();

if (token.equals("$GPRMC")) {
type = TYPE_GPRMC;

token = tokenizer.next();
record.dateTimeOfFix = token.substring(0, 2) + ":"
+ token.substring(2, 4) + ":" + token.substring(4, 6);

record.warning = tokenizer.next().equals(Record.WARNING);

// orig version just stored lat/lon strings

// record.lattitude = tokenizer.next();
// record.lattitudeDirection = tokenizer.next();

// record.longitude = tokenizer.next();
// record.longitudeDirection = tokenizer.next();

// I used a pieces from second src to convert lat/long to decimal degrees

// Latitude
String raw_lat = tokenizer.next();
String lat_deg = raw_lat.substring(0, 2);
String lat_min1 = raw_lat.substring(2, 4);
String lat_min2 = raw_lat.substring(5);
String lat_min3 = "0." + lat_min1 + lat_min2;
float lat_dec = Float.parseFloat(lat_min3)/.6f;
float lat_val = Float.parseFloat(lat_deg) + lat_dec;

// Latitude direction
record.lattitudeDirection = tokenizer.next();

if(record.lattitudeDirection.equals("N")){
// do nothing
} else {
lat_val = lat_val * -1;
}

record.lattitude = lat_val + "";

// Longitude
String raw_lon = tokenizer.next();
String lon_deg = raw_lon.substring(0, 3);
String lon_min1 = raw_lon.substring(3, 5);
String lon_min2 = raw_lon.substring(6);
String lon_min3 = "0." + lon_min1 + lon_min2;
float lon_dec = Float.parseFloat(lon_min3)/.6f;
float lon_val = Float.parseFloat(lon_deg) + lon_dec;

// Longitude direction
record.longitudeDirection = tokenizer.next();

if(record.longitudeDirection.equals("E")){
// do nothing
} else {
lon_val = lon_val * -1;
}

record.longitude = lon_val + "";

record.groundSpeed = tokenizer.next();
record.courseMadeGood = tokenizer.next();

token = tokenizer.next();

record.dateTimeOfFix += "/" + token.substring(0, 2) + "."
+ token.substring(2, 4) + "." + token.substring(4, 6);

record.magneticVariation = tokenizer.next();

} else if (token.equals("$GPGGA")) {
type = TYPE_GPGGA;

// Time of fix
tokenizer.next();

// Lattitude
tokenizer.next();

// Lattitude direction
tokenizer.next();

// Longitude
tokenizer.next();

// Longitude direction
tokenizer.next();
record.quality = tokenizer.next();
record.satelliteCount = tokenizer.next();

// Ignore rest
}

// Type is not supported.
else {
throw new UnsupportedTypeException("Type " + token
+ " is not supported.");
}
}

// Parsing exception.
catch (NoSuchElementException e) {
throw new ParseException("Unexpected end of input.");
}
return type;
}