After I finally got a ZNET 2.5 Coordinator AT associated with a ZNET 2.5 ROUTER / END DEVICE by figuring out that the default JV Channel Verification parameter was key, I stumbled again.
I can send character data from end device to coordinator and see it come out of the UART.
But when I have an end device with the ADC enabled (ATD1=2) and the IO Sampling Rate (ATIR=4E20) set to 20 seconds, I see the coordinator's red LED flicker as data is being received. But nothing appears to come out of the coordinator's UART.
Back to drawing board with Mr Google. I searched websites, blogs, forums. Some are claiming it works great, others are having issues. I'm on the issue side.
Then came across this in the XBee ZNET 2.5 Product Manual, section 4.5.3. Periodic IO Sampling :
Periodic sampling allows an XBee / XBee-PRO module to take an IO sample and transmit it to a remote device at a periodic rate. The periodic sample rate is set by the IR command. If IR is set to 0, periodic sampling is disabled. For all other values of IR, data will be sampled after IR milliseconds have elapsed and transmitted to a remote device. The DH and DL commands determine the destination address of the IO samples. DH and DL can be set to 0 to transmit to the coordinator, or to the 64-bit address of the remote device (SH and SL). Only devices running API firmware can send IO data samples out their Uart. Devices running AT firmware will discard received IO data samples.
 I swear that when I searched around, I found people claiming to receive IO data in AT mode. I surely can't so maybe the manual is on to something. I'll try API mode. Bet it's a boatload of fun.
TIP: When writing API firmware to a device that currently has AT firmware on it (or visa-versa), after the write, X-CTU complains that it failed to enter command mode. This is because the "Enable API" setting on the PC Settings / Host Setup tabs need to be toggled.
After putting ZNET 2.5 COORDINATOR API on, I did start to seem to receive data. But not what I expected. With AT Transparent Mode, I could just read a string straight from the UART and parse away. Now in API Mode I'm getting some weird gook that sure doesn't print very nice. Probably that API Frame thing that I skimmed past in the manual. Darnit, I gotta just sit down and read that thing.
Section 6 API Operations goes into detail about how life has now changed and the free ride is over. It says "API operation requires that communication with the module be done through a structured interface (data is communicated in frames in a defined order)". Oh Joy.
 I started hacking my Python app to see what kinda data I was getting myself into. The frame starts with a start byte of 0x7E and then followed by a two byte length. The IO data that I'm trying to get to is locked away in the Frame Data block that doesn't seem too bad.
Luckily before I started to make a career out of writing a API Frame parsing mess, I went back to Google to see what the trail blazers have done for me. I found the xbee.py file that ladyada used for her tweet-a-watt. Too bad it's for Series 1 and not a lot of help. But the header notes the author as Amit Snyderman. Wonder if he has a Series 2 version. Woo Hoo, he's got some google code at http://code.google.com/p/python-xbee But wait. The page says: The XBee API code is incomplete, missing support for valid checksums and an implementation for working with the Series 2 API. Darn it. Another bad lead.
Well, I'm on the Python Xbee page, I might as well be nosey and poke around. Maybe I can use the Series 1 code as a starting point and hack it up enough to get my single channel ADC data. Let's look it the Subversion source. What's that under the trunk? An XBee 2.5 folder. Woo Hoo!
Grab the xbee_api.py file, save it to your project folder and then for a quick test, write a second file like this:
#!/usr/bin/env python

from xbee_api import *

# replace first param with your serial port
a=XbeeApi("/dev/tts/0",9600)
Save this in a file called coord.py, make it executable (chmod +x coord.py), and run it (./coord.py). Now when sampled IO data is received, this is printed. Do I hear a Woo Hoo?
onData() ->{'code': 146, 'data': {'asamples': [3, 255], 'dsamples': [[0, 0, 0, 0, 0, 0, 1, 1], [1, 1, 1, 1, 1, 1, 1, 1]], 'dmask': [[0, 0, 0, 0, 0, 0, 0, 0], [0, 0, 0, 0, 0, 0, 0, 0]], 'mac': [0, 19, 162, 0, 64, 62, 33, 116], 'samples': [1], 'address': [60, 237], 'amask': [[0, 0, 0, 0, 0, 0, 1, 1]], 'options': [1]}}Now I need to figure out to interpret the data 'asamples'. But this is looking very promising. FYI, I'm going down this path to hook a thermistor to an XBee for my pool thermometer. More details to follow as I make more progress.
data {'asamples': [3, 255], 'dsamples': [[0, 0, 0, 0, 0, 0, 1, 1], [1, 1, 1, 1, 1, 1, 1, 1]], 'dmask': [[0, 0, 0, 0, 0, 0, 0, 0], [0, 0, 0, 0, 0, 0, 0, 0]], 'mac': [0, 19, 162, 0, 64, 62, 33, 116], 'samples': [1], 'address': [60, 237], 'amask': [[0, 0, 0, 0, 0, 0, 1, 1]], 'options': [1]}
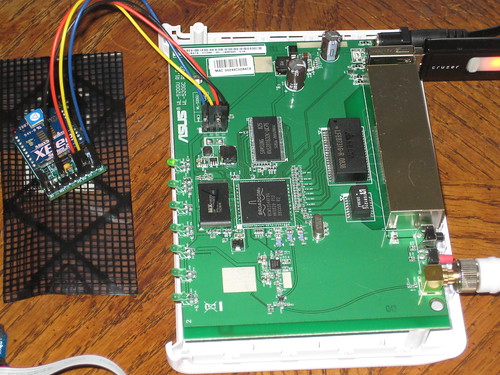
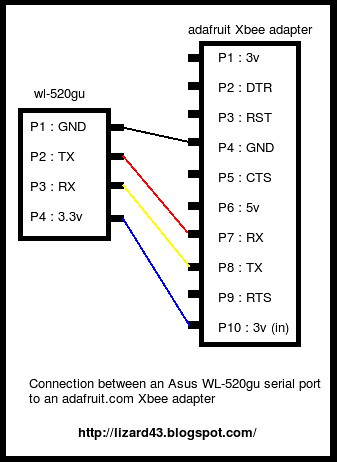
More FYI. I'm running this with OpenWRT on a wl-520gu hacked for my tweet-a-w/e. The receiving XBee is named BLUE. The second XBee is name WHITE and is connected to my laptop with an adafruit XBee Adapter that has ADC pin 2 setup for 20 second periodic IO sampling.
I've saved the today's version of my X-CTU config files here:
BLUE with ZNET 2.5 COORDINATOR API
WHITE with ZNET 2.5 ROUTER / END DEVICE AT with ADC pin 1 enabled and 20 second IO sampling.What do you think? Leave a comment.