

My family is much sadder than me though cause they liked the Boxster better than the 911.

Threadless Ramblings
Software, Engineering, Books, Life, and Projects that I'll Never Finish.


 UPDATE: I've had quite a few hits on this posting and received lots of great comments - thanks very much.
 The Google hit that explained the error, the part number and how to replace is FixYa. Their how-to was a little brief and a picture is worth a thousand so I thought I would help out the next sucker that also has a piece of crap that needs to be fixed.
 With a 17mm socket, remove the bolt that holds on the motor rotor. Turn the bolt to the left (counter clockwise) to remove. The drum will probably turn as you're trying to get the bolt loose so with your free hand, grab the rotor around 10 o'clock and hold tight while you turn the bolt. Be patient and it'll come right out.
 Next,you need to pull the motor rotor off to expose the stator. This will be a little tough because of the magnets and a tight fit. Use both hands on opposite sides and gently tug one side, then the other, then both. Try your hands at 1 o'clock and 7 o'clock. Then switch to 5 and 11. Be patient and tug gently. Watch the white center and you'll see it slowly pull away from the shaft.


 When you remove the 6th bolt, use your free hand to hold on to the stator cause it will fall right off. There are two connectors at the bottom, one the goes to the motor windings, the other to the hall sensor that we're replacing. If you don't hold onto the stator, you might damage the wires or connectors. Go slow on the last bolt and hang on.
 Here's what those connector look like from the bottom side. I didn't have any luck trying to get them free from the bottom though. I was kinda squeezed in between the wall and washer so I didn't have much room to wiggle. I let the stator lean towards me like the picture above and then gently pulled both connectors free. Don't go Rambo on these connectors, you don't need to replace extra stuff. Breathe deep and squeeze the little tabs, they'll come free.
 Almost there. That shiny looking thing on the bottom right of the stator ring is the hall sensor. It's held on with 3 clips on the back side, 1 clip on the front. Simple pry up the 1 clip and it will pop free.
 The new sensor snaps back on just like you'd expect. Hook up the 3 clips first and then snap it on to the 1 clip side.
 Sometimes you just have to give in. I tried to be strong but night after night. Day after day. All I heard was "buy me, buy me". How much is a man expected to take? We can only be so strong before we all break down.
 Anyway, I've been thinking a lot about the new Camaros. But with all the trouble GM has been having, I'm just not excited about paying $10K premium to a company that's on the verge of bankrupcy. And the last few years of Chevrolets really haven't seemed like quality cars. Probably not a good choice.
 So I've been cruising Craigslist and eBay looking at other sports cars that I've wanted since I was 13. High on the list was a Datsun 280Z. Man, I wanted one of those so bad back then. When I look at them now, they're kinda cheesy. Not sure what was driving my desire back then. Maybe puberty.
 The idea of a Boxster Roadster stayed with me though. And Mr Craiglist led me to the next beautiful car. The Great White.
 After I posted the Yahoo Baseball Greasemonkey script, I remembered another script that I have that's worth sharing. Not my Yahoo Football Greasemonkey script which does the same as the baseball (shows in-game stats on tab title) but another more
  I wrote a quick script that replaces the little icon to the left of each link with the link src. And since loading these images may be time consuming, you don't want to do this on every "Index of /" page that you come across. So we wrap that function up in a "Show Images" link at the top of the page when it completes loading.
 I love baseball. But you gotta admit that it can be boring "watching" a game on the web. If not watching it in person or on tv, it's kinda slow. I'm sorta ADD when cruising the web. I usually have 6 or more Firefox tabs open at once. I'm reading something, writing something, searching for something all at the same time. It's a wonder that I get anything done at all, but amazingly it works out.
 Notice a few other things. The Firefox tab says "MLB - Kansas City Royals/M...". I'd like this to display something useful like the current in-progress game stats. Also see the Inning Summary table at the bottom. Below that is a Scoring Summary that can't be seen unless you scroll down.
 So my typical game "watching" experience is every 5-10 minutes, click the tab, look at the score. If different than last time I looked, grab the scroll bar and go way down to see what happened. Way too much work.
 I then replaced the advertisement block (yahoo isn't currently using it anyway) with the scoring summary so no painful scrolling occurs.
function changeWidth() {
var node = document.evaluate('//table[@width="974"]',
document,
null,
XPathResult.UNORDERED_NODE_SNAPSHOT_TYPE,
null);
node.snapshotItem(0).width="100%";
}Here's a big part of the magic. Find the table that wraps the team name and score and parse it out. The team names are long and we need shorten them so they fit it the tab nicely.function getScore() {
var scoreNode = document.evaluate(
'//td[@class="yspsctnhdln"]',
document,
null,
XPathResult.UNORDERED_NODE_SNAPSHOT_TYPE,
null);
scoreNode = (scoreNode.snapshotItem(0));
// this is ugly but I want to shorten the team so all the info displays nice on the tab
var str = scoreNode.textContent;
str = str.replace(/\n/g, "");
str = str.replace(/ /g, "");
str = str.replace(/,/g, "");
str = str.replace("Arizona", "AZ");
str = str.replace("Atlanta", "Atl");
str = str.replace("Baltimore", "Bal");
str = str.replace("Boston", "Bos");
str = str.replace("Chi Cubs", "Cub");
str = str.replace("Chi White Sox", "CWS");
str = str.replace("Cincinnati", "Cin");
str = str.replace("Cleveland", "Cle");
str = str.replace("Colorado", "Col");
str = str.replace("Detroit", "Det");
str = str.replace("Florida", "FL");
str = str.replace("Houston", "Hou");
str = str.replace("Kansas City", "KC");
str = str.replace("Minnesota", "Min");
str = str.replace("Milwaukee", "Mil");
str = str.replace("LA Angels", "LAA");
str = str.replace("LA Dodgers", "LAD");
str = str.replace("NY Mets", "Met");
str = str.replace("NY Yankees", "NYY");
str = str.replace("Oakland", "Oak");
str = str.replace("Philadelphia", "Phi");
str = str.replace("Pittsburgh", "Pit");
str = str.replace("San Diego", "SD");
str = str.replace("San Francisco", "SF");
str = str.replace("Seattle", "Sea");
str = str.replace("St. Louis", "SL");
str = str.replace("Tampa Bay", "Tam");
str = str.replace("Toronto", "Tor");
str = str.replace("Texas", "Tex");
str = str.replace("Washington", "Was");
str = str.replace(/ /g, "");
// get inning and shorten
var inning = getInning();
inning = inning.replace(/\n/g, "");
inning = inning.replace(/ /g, "");
inning = inning.replace(/Bot /g, "B");
inning = inning.replace(/Top /g, "T");
inning = inning.replace(/End /g, "E");
document.title = str + ' ' + inning + ' ' + getOut();
}In the above code, I didn't put a comment on this line but this is where the Firefox tab gets the in-game stats:document.title = str + ' ' + inning + ' ' + getOut();And more parsing. And then some really ugly if-else code. Kinda embarrassing that I did this. But I did and I'm too lazy to re-write.
function getOut() {
var balls = document.evaluate("//*[contains(.,'O:')]/b",
document, null, XPathResult.FIRST_ORDERED_NODE_TYPE, null).singleNodeValue;

var count = "";
if (balls) {
var n= balls.nextSibling;
var strikes = n.nextSibling;
n = strikes.nextSibling;
var outs= n.nextSibling;
count = balls.innerHTML + '-' + strikes.innerHTML + ' O:'+ outs.innerHTML;
}

// find how many men are on base.
// do this by looking at what image is being displayed.
// yeah, I need to clean this up but it works and I don't have time.  go for it
var men = document.evaluate("//img[contains(@src,'tr_empty.gif')]",
document, null, XPathResult.FIRST_ORDERED_NODE_TYPE, null).singleNodeValue;
if (men) {
men = "empty";
}
else {
men = document.evaluate("//img[contains(@src,'tr_1b.gif')]",
document, null, XPathResult.FIRST_ORDERED_NODE_TYPE, null).singleNodeValue;

if (men) {
   men = "1b";
}
else {
   men = document.evaluate("//img[contains(@src,'tr_2b.gif')]",
   document, null, XPathResult.FIRST_ORDERED_NODE_TYPE, null).singleNodeValue;
   if (men) {
       men = "2b";
   }
   else {
       men = document.evaluate("//img[contains(@src,'tr_3b.gif')]",
       document, null, XPathResult.FIRST_ORDERED_NODE_TYPE, null).singleNodeValue;
       if (men) {
           men = "3b";
       }
       else {
           men = document.evaluate("//img[contains(@src,'tr_1b2b.gif')]",
           document, null, XPathResult.FIRST_ORDERED_NODE_TYPE, null).singleNodeValue;
           if (men) {
               men = "1b2b";
           }
           else {
               men = document.evaluate("//img[contains(@src,'tr_1b3b.gif')]",
               document, null, XPathResult.FIRST_ORDERED_NODE_TYPE, null).singleNodeValue;
               if (men) {
                   men = "1b3b";
               }
               else {
                   men = document.evaluate("//img[contains(@src,'tr_2b3b.gif')]",
                   document, null, XPathResult.FIRST_ORDERED_NODE_TYPE, null).singleNodeValue;
                   if (men) {
                       men = "2b3b";
                   }
                   else {
                       men = document.evaluate("//img[contains(@src,'tr_full.gif')]",
                       document, null, XPathResult.FIRST_ORDERED_NODE_TYPE, null).singleNodeValue;
                       if (men) {
                           men = "full";
                       }
                       else {
                           men = "";
                       }
                   }
               }
           }
       }
   }
}
}
return count + ' ' + men;
}
And that's about it. Take a look at the file at userscripts.org and give it a try. Let me know if you've improved and found some bugs. After I finally got a ZNET 2.5 Coordinator AT associated with a ZNET 2.5 ROUTER / END DEVICE by figuring out that the default JV Channel Verification parameter was key, I stumbled again.
Periodic sampling allows an XBee / XBee-PRO module to take an IO sample and transmit it to a remote device at a periodic rate. The periodic sample rate is set by the IR command. If IR is set to 0, periodic sampling is disabled. For all other values of IR, data will be sampled after IR milliseconds have elapsed and transmitted to a remote device. The DH and DL commands determine the destination address of the IO samples. DH and DL can be set to 0 to transmit to the coordinator, or to the 64-bit address of the remote device (SH and SL). Only devices running API firmware can send IO data samples out their Uart. Devices running AT firmware will discard received IO data samples.
 I swear that when I searched around, I found people claiming to receive IO data in AT mode. I surely can't so maybe the manual is on to something. I'll try API mode. Bet it's a boatload of fun.
 I started hacking my Python app to see what kinda data I was getting myself into. The frame starts with a start byte of 0x7E and then followed by a two byte length. The IO data that I'm trying to get to is locked away in the Frame Data block that doesn't seem too bad.
#!/usr/bin/env python
from xbee_api import *
# replace first param with your serial port
a=XbeeApi("/dev/tts/0",9600)
onData() ->{'code': 146, 'data': {'asamples': [3, 255], 'dsamples': [[0, 0, 0, 0, 0, 0, 1, 1], [1, 1, 1, 1, 1, 1, 1, 1]], 'dmask': [[0, 0, 0, 0, 0, 0, 0, 0], [0, 0, 0, 0, 0, 0, 0, 0]], 'mac': [0, 19, 162, 0, 64, 62, 33, 116], 'samples': [1], 'address': [60, 237], 'amask': [[0, 0, 0, 0, 0, 0, 1, 1]], 'options': [1]}}Now I need to figure out to interpret the data 'asamples'. But this is looking very promising. FYI, I'm going down this path to hook a thermistor to an XBee for my pool thermometer. More details to follow as I make more progress.
data {'asamples': [3, 255], 'dsamples': [[0, 0, 0, 0, 0, 0, 1, 1], [1, 1, 1, 1, 1, 1, 1, 1]], 'dmask': [[0, 0, 0, 0, 0, 0, 0, 0], [0, 0, 0, 0, 0, 0, 0, 0]], 'mac': [0, 19, 162, 0, 64, 62, 33, 116], 'samples': [1], 'address': [60, 237], 'amask': [[0, 0, 0, 0, 0, 0, 1, 1]], 'options': [1]}
BLUE with ZNET 2.5 COORDINATOR API
WHITE with ZNET 2.5 ROUTER / END DEVICE AT with ADC pin 1 enabled and 20 second IO sampling.What do you think? Leave a comment.
 Damn it. Why do the simplest things always take hours to complete? I'm using XBee Series 2 cause I really didn't know what I was buying. Series 1 or Series 2? To a newb, sounds like 2 is the shiny. Why buy an out-dated series 1? Nobody wants last year's model.
 For an end device called WHITE that will talk to another end device named PINK, use X-CTU and load the ZNET 2.5 Router / End Device AT firmware. Go to the X-CTU Terminal tab and type:
+++Here's the X-CTU file for WHITE.
ATRE
ATNIWHITE
ATDNPINK
ATWR
Association is the establishment of membership between End Devices and a Coordinator. The establishment of membership is useful in scenarios that require a central unit (Coordinator) to relay messages to or gather data from several remote units (End Devices), assign channels or assign PAN ID.The series 2 manual seems pretty decent. I've read many sections and need to sit down and attempt to read more. Too bad though that it doesn't mention parameter JV Channel Verification. Which is the parameter that finally made a difference.
 And for basic communications, that should be it. No need to set destination address of the end device explicitly to the coordinator. The 0's do that for you.
Set/read the channel verification setting. If enabled, a router will verify a coordinator exists on the same channel after joining or power cycling to ensure it is operating on a valid channel, and will leave if a coordinator cannot be found (if NJ=0xFF). If disabled, the router will remain on the same channel through power cycles.In English, this means that if your devices are on different channels and JV is disabled, you're fricked cause the router won't go to another channel to associate.
 Just got done building an XBee Adapter and tested it in 34 minutes. That's right, 2040 seconds. Or 0.566666667 hours. Either way, it's PDQ.
 I did a few things different this time though. Since I don't have a PCB vice, I'm stuck with having the board laying flat on my bench. So I soldered in the 74125 buffer first, the female header sockets next, all the other pieces, and the male header pins last. Your mileage may vary, it was just simpler for me in that order.
 I finished soldering, slapped in an XBee and ran a test script that tweeted a tid bit to twitter. I knew I was making good progress but only noticed how fast after I snapped a second picture, and saw the timestamp. 34 minutes. I can't even make minute rice in 34 minutes.
 My explanation of the tweet-a-w/e ran pretty long in my last post. I took an Asus wl-520gu wireless router, installed OpenWrt, Python, and an Xbee to build the foundation of a tweet-a-whatever (tweet-a-w/e). My 13 year-old texting obsessed daughter choose that name BTW. The last post ran so long that I cut it off after I talked about how to read the serial port with pySerial.
 Here's basically what I've done. Heavily borrowed from mightyOhm and ladyada, this project receives data from Xbees in "the field". Using a unique header, the client app determines the payload destination which can be a tweet or a web service.
# opkg updateAnd finally install python-twitter:
# opkg install openssl-util
# tweet-a-w/e stuff array
#   "whatever", header string, action, user, password
#
WE_ARRAY = [
['WE_TEST', '[0]', _tweet_it, 'username', 'password'],
['WE_TEMPERATURE', '[1]', _web_it, 'username2', 'password'],
['WE_NIKEPLUS', '[2]', _stalk_it, 'username3', 'password'],
['WE_XBEE', '0x7e', _tweet_it, 'username4', 'password']
]
The action array elements are functions to perform the tweet or web action. Here's what I defined:
#
# define functions to do something with received data
#

# tweet data
#
def _tweet_it(data, twuser, twpass):
# login to twitter
print 'tweet w/' + twuser
api = twitter.Api(username=twuser, password=twpass)
api.PostUpdate(data)

# web service data
#
def _web_it(data, twuser, twpass):
# tbd
print 'wrote to web service w/' + twuser

# stalk the data
#
def _stalk_it(data, twuser, twpass):
# tbd
print 'watch it w/' + twuser
Ok, now let's read the data and determine what we got:
# open up the serial port on router
#
print 'opening serial port ' + SERIALPORT
ser = serial.Serial(SERIALPORT, BAUDRATE, timeout=TIMEOUT)
ser.open()

# read data
#
try:
print 'entering read loop'

# loop forever
while 1:

# read it from serial port
data = ser.read(NUMCHARS)
if len(data) > 0:
print 'Read: ' + data

# loop thru our whatever array and see if we recognize the header
for i in range(0, len(WE_ARRAY)-1):
if data.startswith(WE_ARRAY[i][1]):
print WE_ARRAY[i][0] + " action " + WE_ARRAY[i][2].__name__
WE_ARRAY[i][2](data, WE_ARRAY[i][3], WE_ARRAY[i][4])
break

finally:
print 'closing serial port'
ser.close
The only tricky thing in that code is the action call. Once we have a header match, the 2nd array element is one of the action functions that we defined. Simply call it and pass the data, username/password as arguments.
root@OpenWrt:/opt/project# python XbeeReader.pyAnd send it something. For me, a quick test is to use another Xbee in the SparkFun Xbee Explorer. When I plug this in to my laptop, it shows up as /dev/ttyUSB0 so to write a quick string is as simple as:
d@hopper:~/projects/wl-520gu$ echo "[0] Testing " + `date` > /dev/ttyUSB0And on the router telnet window, I see:
opening serial port /dev/tts/0I'm using a test twitter account and viola, the string "[0] Testing" shows up like magic.
entering read loop
Read: [0] Testing + Thu Mar 26 23:30:47 EDT 2009
WE_TEST action _tweet_it
tweet w/skibicki
+++Here's the X-CTU file for WHITE.
ATNI WHITE
ATDN PINK
ATWR
 Update: Newegg no longer stocks the Asus WL-520GU router but this is still a cool project. You can find these routers for $10-20 (or more) on eBay. Also someone sent me a comment that the Linksys WRT54G routers have serial ports that could be used in a similar manner. I haven't tried this yet but if a cheap Linksys router comes my way, I'll try and attempt to blog about it.
 Not to be out done, LadyAda hacked her 520gu and ported her tweet-a-watt xBee code in a 5 hour hack fest. That's her router picture over on the right. Click it and see a brief description of her efforts. She mentions this project on twitter and on flicker but I haven't seen it on her blog. I've been messing with Xbees lately and ladyada's hack is just what i need.
 Or maybe a tweet-a-lert that let's me know when my super-sekret door has been opened. Or a tweet-a-stalk when a victim with Nike+ shoes runs by a sensor.We'll take a wl-520gu router, install openWrt firmware and configure it as a wireless client to my existing house wireless network. Using the 520gu's serial port, I'll hook up an Xbee in an Adafruit adapter. Next, install Python on an automount USB drive and write a client that reads incoming Xbee data and does the tweet.
 Back already? Good, you should have a router with OpenWrt that acts like a wireless client on your network. You should be able to wirelessly connect via telnet as well as via the serial port.
Python 2.5.4
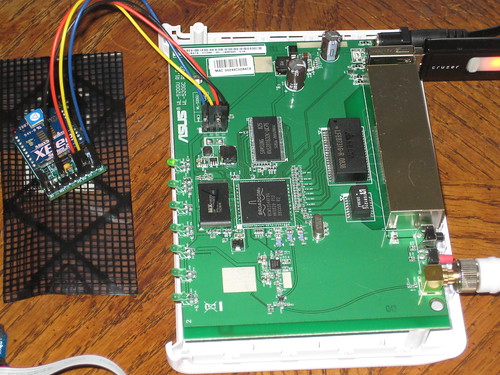
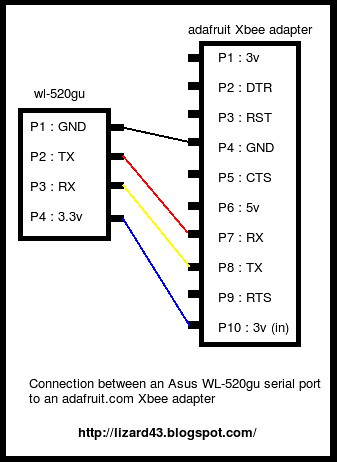 Using the AdaFruit Xbee Adapter that I blogged about last year, the next step is to simply hook it up to the 4-pin serial headers. This is the easiest step of all. 4 wires, hook 'em up.
Since OpenWrt uses the serial port /dev/tts for console login, we need to modify the /etc/inittab file. All this takes is to comment out the tts line:
- wl-520gu GND -> Xbee GND
- wl-520gu 3V -> Xbee 3V
- wl-520gu TX -> Xbee RX
- wl-520gu RX -> Xbee TX
I've modified the reader.py quite a bit so that it tweets the received data, but the version above simply echoes the data to the terminal.
#!/usr/bin/env python
import serial, time

SERIALPORT = "/dev/tts/0"     # the com/serial port the XBee is connected to
BAUDRATE = 9600               # the baud rate we talk to the xbee
TIMEOUT = 0.5                 # the timeout to wait for buffer fill
NUMCHARS = 140                # the number of characters to attempt to read at once

# open up the FTDI serial port to get data transmitted to xbee
print 'opening serial port ' + SERIALPORT
ser = serial.Serial(SERIALPORT, BAUDRATE, timeout=TIMEOUT)
ser.open()

try:
print 'entering read loop'
while 1 > 0:
data = ser.read(NUMCHARS)
if len(data) > 0:
print "Read " + data
finally:
print 'closing serial port'
ser.close
# python reader.pySend the Xbee data from another Xbee and watch it print.

 Using Ubuntu 8.04 Hardy Heron, I figured it would be easy to format a thumb drive to ext3. Seems for me that nutin is easy. My plans for the USB stick is to use it with an embedded Linux box that could expectantly shutdown.
The ext3 or third extended filesystem is a journaled file system that is commonly used by the Linux kernel. It is the default file system for many popular Linux distributions.After a few struggles with attempting to use the Partition Editior, I ended up reformatting the stick by following these instructions:
...
Its main advantage over ext2 is journaling which improves reliability and eliminates the need to check the file system after an unclean shutdown.


